Official Luthiers Forum! http://mowrystrings.luthiersforum.com/forum/ |
|
Joe's L-1 Build http://mowrystrings.luthiersforum.com/forum/viewtopic.php?f=10145&t=47981 |
Page 1 of 3 |
Author: | JoeM [ Tue Jul 05, 2016 5:34 pm ] |
Post subject: | Joe's L-1 Build |
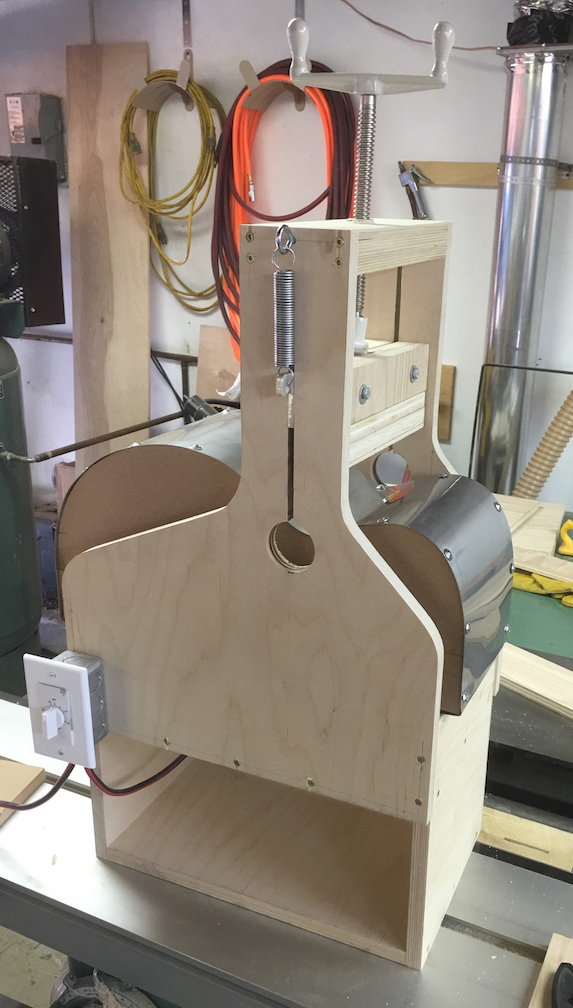
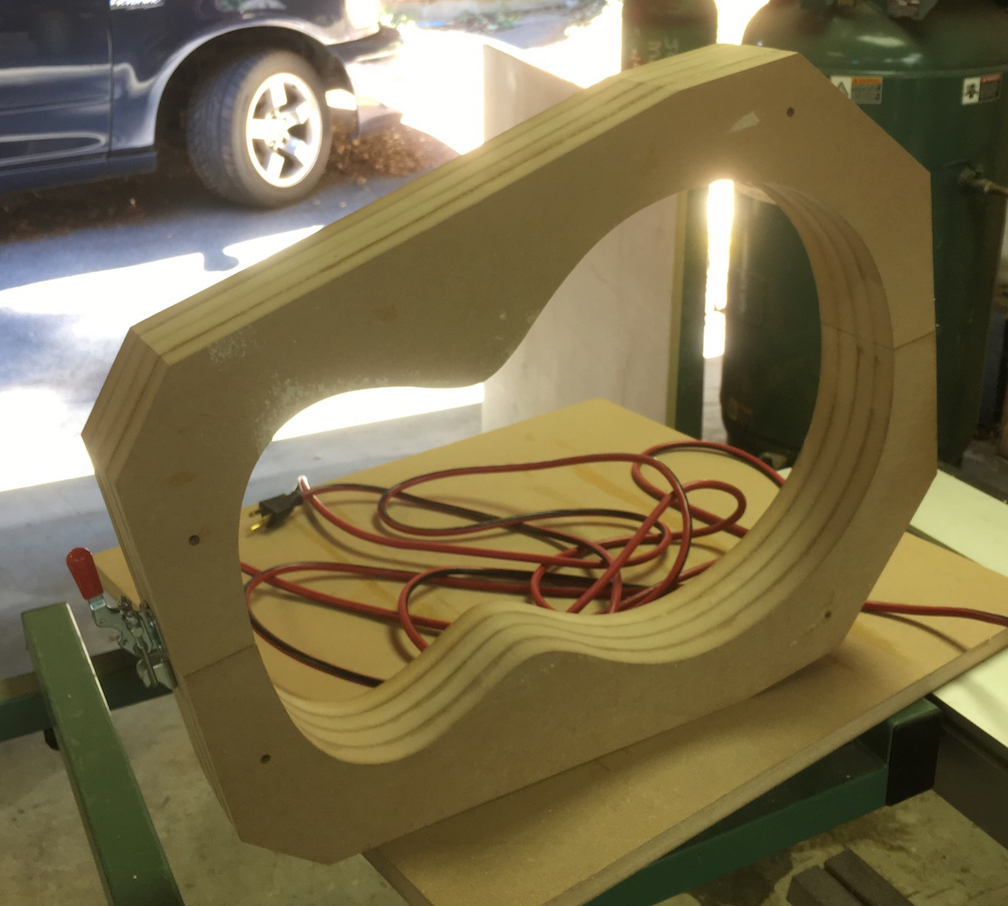
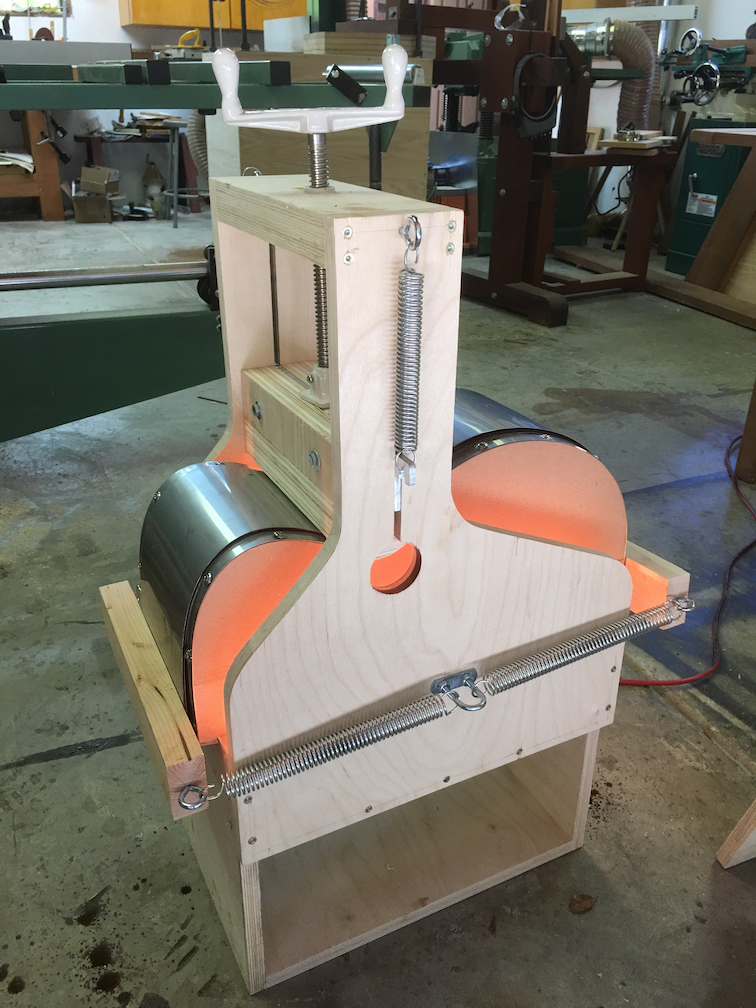
OK, it may be premature to post something committing to building a guitar, but what the heck? I've built lots of stuff, but never a guitar. Furniture, custom cars and motorcycles, knives, etc, etc. A little of this, and a little of that. I'm not expert at anything, I just like to tinker. I'm also not much of a guitar player either, I just started learning about six months ago. I've decided on building a Gibson-ish L-1 clone from Georgia Luthier plans. Over the weekend I started building tooling. First, a go-bar press. I built it as a roll around cart with the idea I could store extra radius plates in the bottom. I'll probably add some dividers and shelves, and maybe doors to it once I have a better handle on where I'm going. Storing the fox bender would free up a little space in the shop. The bender is nearly done. I need to add the springs and hold-downs, but it seems like it should work. I have three 150 watt light bulbs in it for heat. The form for the L1 is done. I lined the inside with thin sheetmetal and covered the top with thin stainless. And finally the mold is done. I ordered some materials from LMII and StewMac (kerfing, brace wood, spruce for the top, etc.) I have some Sapele that I'm planning to resaw for the sides and back. I'll probably make a bending pipe to pre-bend the waist as I'm concerned about that area. It will be interesting to see how this goes. |
Author: | cphanna [ Tue Jul 05, 2016 5:52 pm ] |
Post subject: | Re: Joe's L-1 Build |
Okay, Joe, Keep the progress photos coming. When you get into the tricky stuff (thickenssing, bracing, etc.) I recommend you ask for advice here, because some very expert members will help you. |
Author: | SteveSmith [ Tue Jul 05, 2016 6:06 pm ] |
Post subject: | Re: Joe's L-1 Build |
Welcome Joe. Based on the look of the tooling I don't think you'll have a problem - not saying there isn't a lot to learn but looks like you have the right skill set to jump in here. |
Author: | rlrhett [ Tue Jul 05, 2016 11:01 pm ] |
Post subject: | Re: Joe's L-1 Build |
I would say you are on to a great start! I also am a huge fan of the L's. I've built a few L inspired guitars and think it is just about my favorite sized guitar for finger style playing. |
Author: | Barry Daniels [ Wed Jul 06, 2016 11:14 am ] |
Post subject: | Re: Joe's L-1 Build |
I am worried that your bender might be a problem. Light bulb benders use an open design with round metal bars spaced out to allow the heat though to the wood. Your metal slat will block the movement of heat and will only get hot on the surface of the metal slat. The wood will only get hot by contact with that surface, so it will be bending cold until it gets down into the waist where it finally contacts that surface. I can hear the cracking sound from here. |
Author: | Bryan Bear [ Wed Jul 06, 2016 12:52 pm ] |
Post subject: | Re: Joe's L-1 Build |
Barry Daniels wrote: I am worried that your bender might be a problem. Light bulb benders use an open design with round metal bars spaced out to allow the heat though to the wood. Your metal slat will block the movement of heat and will only get hot on the surface of the metal slat. The wood will only get hot by contact with that surface, so it will be bending cold until it gets down into the waist where it finally contacts that surface. I can hear the cracking sound from here. He did say that he was going to make a bender to pre-bend the waist. That will help. But bending the bouts will still be problematic because the slats will be more of a heat shield (rather than conductor) until they are in physical contact with the wood. Lots of people have reported success with light bulbs but was not able to get it to work well when I tried. To be fair, I didn't work with them long; I bought a blanket shortly after I started. Then again, I did the first two instruments with a heat gun and patience (and burned fingers). |
Author: | fingerstyle1978 [ Wed Jul 06, 2016 8:22 pm ] |
Post subject: | Re: Joe's L-1 Build |
Bryan Bear wrote: Barry Daniels wrote: I am worried that your bender might be a problem. Light bulb benders use an open design with round metal bars spaced out to allow the heat though to the wood. Your metal slat will block the movement of heat and will only get hot on the surface of the metal slat. The wood will only get hot by contact with that surface, so it will be bending cold until it gets down into the waist where it finally contacts that surface. I can hear the cracking sound from here. He did say that he was going to make a bender to pre-bend the waist. That will help. But bending the bouts will still be problematic because the slats will be more of a heat shield (rather than conductor) until they are in physical contact with the wood. Lots of people have reported success with light bulbs but was not able to get it to work well when I tried. To be fair, I didn't work with them long; I bought a blanket shortly after I started. Then again, I did the first two instruments with a heat gun and patience (and burned fingers). I agree with both of you guys. Adding a heating blanket to this system and heating from the top an the bottom he'd have a pretty buttery bender, especially for the more difficult woods, like quilted maple, ebony etc. Or you could simply use the heat blanket, but since the bulbs system is cheap I'd probably elect to keep it, add a blanket and then run a splitter to a timer/temp control that controls both. |
Author: | JoeM [ Thu Jul 07, 2016 12:41 am ] |
Post subject: | Re: Joe's L-1 Build |
I'm a bit worried about that too, we'll see what happens. I should be ready to try bending sides this weekend. The light bulbs are cheap, but may not do the trick. I wouldn't be surprised if it took a while to work out the kinks in bending. |
Author: | Rodger Knox [ Thu Jul 07, 2016 2:55 pm ] |
Post subject: | Re: Joe's L-1 Build |
You can also use a clothes iron as an external heat source. viewtopic.php?f=10133&t=37283&start=25 Scroll down to the bottom of page 2. |
Author: | JoeM [ Sun Jul 10, 2016 9:11 pm ] |
Post subject: | Re: Joe's L-1 Build |
I bent the first side this afternoon, seemed to go OK. I resawed some 8/4 sapele and planed it to .080, wet it with veneer softener, sandwiched it between two stainless sheets and pressed it. No pre-bending. I let the bender heat up for 20 minutes while the veneer softener soaked into the side blank. Then I put it in the press and let it sit for a few minutes, then slowly pressed the waist home. I let it cook about 20 or 25 minutes in the bender, then left it there for a couple of hours (we had company). I just pulled it out, no cracks and the bend looks right. It fits in my mold just right. I'll do the other side tomorrow and see if this was a fluke. |
Author: | Rodger Knox [ Mon Jul 11, 2016 10:14 am ] |
Post subject: | Re: Joe's L-1 Build |
I use a light bulb bended, and I'm surprised you didn't have trouble with the waist bend. The light bulbs don't heat all that effectively until the wood is in contact with the bending form. I usually heat the waist area from outside with a clothes iron before clamping it onto the form. I guess with the veneer softener works. |
Author: | JoeM [ Tue Jul 12, 2016 8:14 pm ] |
Post subject: | Re: Joe's L-1 Build |
Slow progress, it's like watching a glass of water evaporating here. Both sides are bent, and I made the end blocks and glued them in. I actually made them twice, I used some Sapele offcuts originally, but I wasn't happy with the work on them. And I didn't want to cut up a whole board to re-make them, so I found a scrap of honduran mahogany and used that instead. This time they came out OK. It's been a while since I've been active in the shop (long story), so I'm a little out of practice. I ordered a couple of radius dishes a while back, they should be here this week so I can start on the top and bottom soon. My main concern in this build right now is the neck angle to the body and getting that right so the action is good and there isn't a hump at the 12th fret. |
Author: | JoeM [ Sat Jul 16, 2016 6:47 pm ] |
Post subject: | Re: Joe's L-1 Build |
I got a little shop time in today, the sides of the body are pretty much done and I've started adding the bracing to the back. The sides and back are resawn from a Sapele board I've had laying in the shop for a couple of years. The little tie braces on the sides and head/tail blocks are from Honduras Mahogany that I've had for probably 10 years left over from something else. I know this is all simple stuff for you guys, but I'm making this up as I go, never been down this road before. Looking at the pics now I can see I got a little sloppy with the glue in a couple of places, I'll have to be more careful. I guess I'm out of practice, haven't been in the shop in the past year due to some back trouble. I love some of the other projects, it's hard not getting distracted! |
Author: | Rodger Knox [ Sun Jul 17, 2016 1:59 pm ] |
Post subject: | Re: Joe's L-1 Build |
JoeM wrote: My main concern in this build right now is the neck angle to the body and getting that right so the action is good and there isn't a hump at the 12th fret. There's quite a few ways to accomplish that, which book or plan are you following? I started with Cumpiano's book, and his method is easier to do than explain, it's a 3D geometry problem. He bevels the heel in toward the tenion, so that as the heel tapers to the bottom, it sits further down on the bevel, slightly angleing the neck. A flat spot is sanded into the top for the fretboard. Whatever method you choose or make up, it all comes down to woodworking, and it appears to me your skills are more than adequate for the task. |
Author: | Haans [ Sun Jul 17, 2016 4:58 pm ] |
Post subject: | Re: Joe's L-1 Build |
One very simple way to attack the neck problem is the way I had done it for years... Make a cylindrical sanding rectangle form and use a cylinder shape on the top that is flat ALONG the grain. This way your top is flat from neck joint to bridge. Look close enough and you can see the cylinder shape of the "disc". Instead of rotating the rectangle to sand the curve into the top side of the ribs, it's pushed back and forth. It's relatively easy to make the form, just make a sled with the proper radius and set the router on it with a flat cutting bit and slowly rout the curve into the rectangle. I used MDF and backed it with baltic birch ply. I always used a high radius of 10' as I built Larson instruments. It's so very easy to set the neck angle as you are not dealing with compound curves of a dished top. |
Author: | J De Rocher [ Sun Jul 17, 2016 5:35 pm ] |
Post subject: | Re: Joe's L-1 Build |
I use a cylindrical sanding dish to profile the top edges of the rims too. That was how I was taught to do it by Rick Davis for exactly the reason you mentioned and it works great. I made my cylindrical dish by building a box out of maple ply that's 24" x 34" and about 2" tall. I made radiused ribs that go crosswise on the box and glued a sheet of 1/8" thick ply which is flexible down onto the ribs. Since the surface area is quite a bit larger than the guitar body, I clamp the the dish to the bench and sand by moving the body (clamped in the body mold) back and forth lengthwise on the dish. The weight of the mold plus the body does the work. |
Author: | Rodger Knox [ Mon Jul 18, 2016 11:46 am ] |
Post subject: | Re: Joe's L-1 Build |
I have used the cylindrical top as well (15' radius), and it does work nicely. Now I use a flat upper bout and transition to a spherical (15' radius) lower bout. With a 90° neck angle, the height of the strings above the top at the bridge is about 1/2". |
Author: | JoeM [ Thu Jul 28, 2016 12:08 pm ] |
Post subject: | Re: Joe's L-1 Build |
Thanks for the thoughts on netting up the neck angle. I've got several books (all of the obvious ones) and am working form the Georgia Luthier plans...although I don't think there is much about this particular detail in the plans. The plans don't call out a specific radius for the top or back (in fact I think they assume the top is dead flat). I'm using a 28' dish for the top and a 15' dish for the back. I can imagine that having a compound shape on the top will complicate fitting the fretboard extension -- either the top will need to be flattened under the fretboard (probably my approach) or the bottom of the fretboard would need to be sanded into a compound shape. Or maybe the difference in shapes and the relative thickness of the parts might allow the parts to flex enough to glue up (not a fan of this line of thinking). Separately there is the whole issue of getting the angle and action right. Running into issues and problem solving is part of the fun, right? I've been out of town the past week visiting family so haven't made much progress. In fact I'm out of town next week too at the Port Townsend Acoustic Blues camp. I'm really looking forward to that. I did get the braces glued on the back. I hope to sharpen my block plane and shape them this afternoon. |
Author: | SteveSmith [ Fri Jul 29, 2016 11:47 am ] |
Post subject: | Re: Joe's L-1 Build |
Another approach to setting the neck angle - and the one I use with a 25' radius top. http://www.luthiersforum.com/forum/viewtopic.php?f=10117&t=25931 |
Author: | JoeM [ Mon Aug 15, 2016 10:50 am ] |
Post subject: | Re: Joe's L-1 Build |
Back from blues guitar camp (very fun!) and back to tinkering with my guitar project. I did the rosette (W/B/W plastic) and glued in the braces on the front yesterday. I did plastic for the rosette both because that was used on the originals, and I want to try using a padded-on dye burst finish on the top. I'm hoping to have time to shape the braces on the front and back today. And make a bunch of spool clamps so I can close up the body soon. I'm really curious as to how this is going to sound when it's done, but at the rate that I'm moving it will be a while before my curiosity is satisfied. |
Author: | JoeM [ Wed Aug 24, 2016 5:03 pm ] |
Post subject: | Re: Joe's L-1 Build |
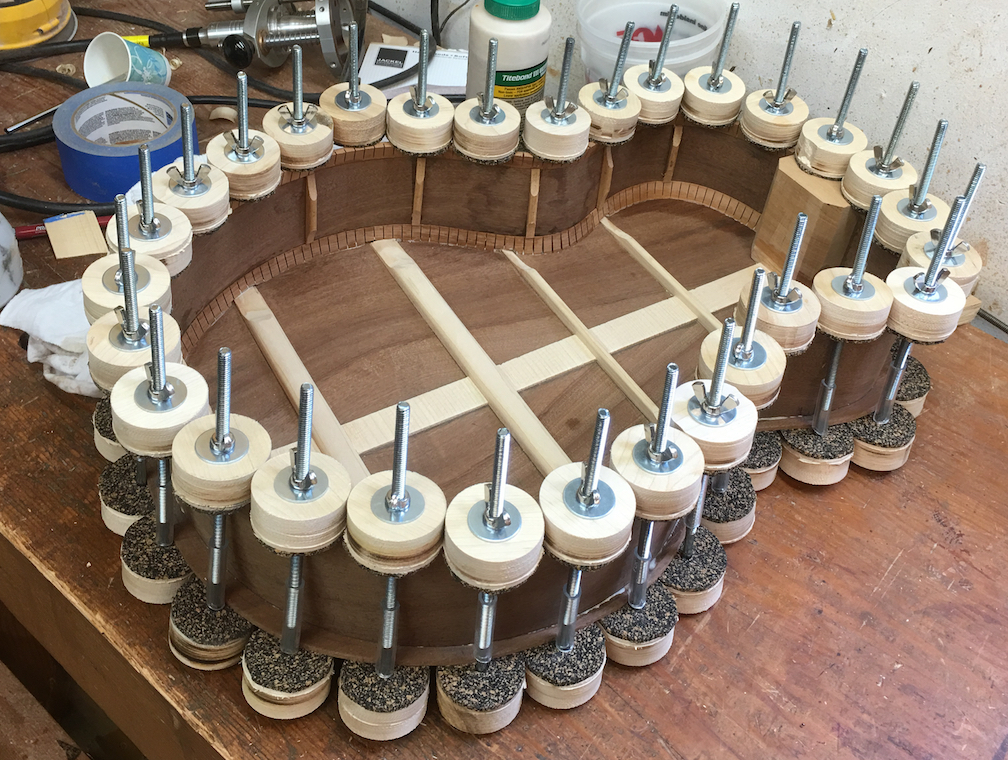
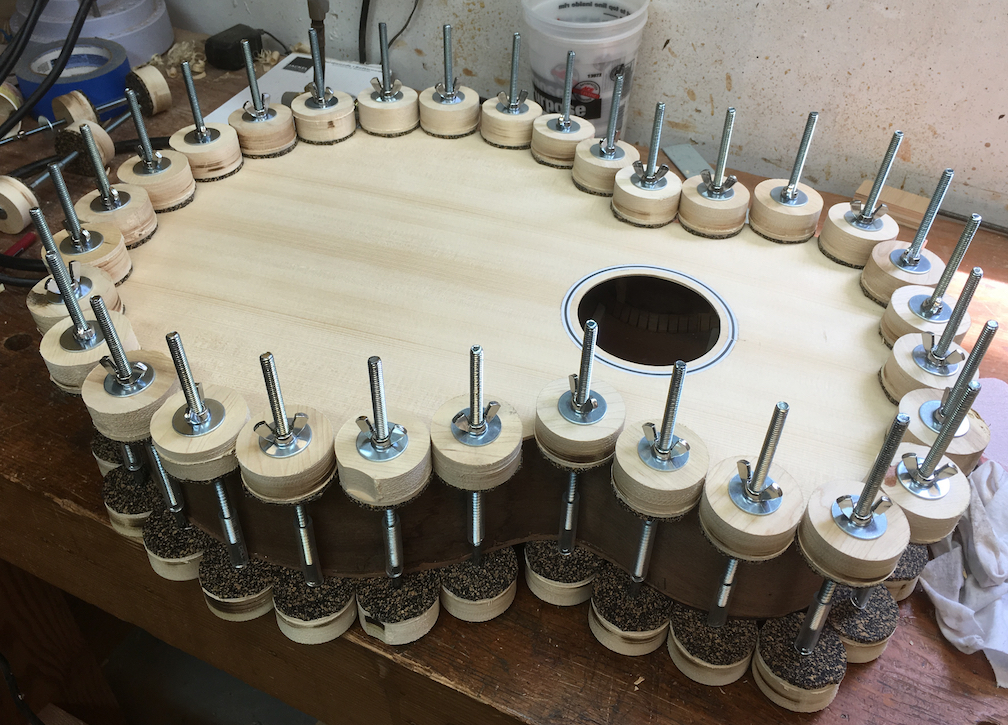
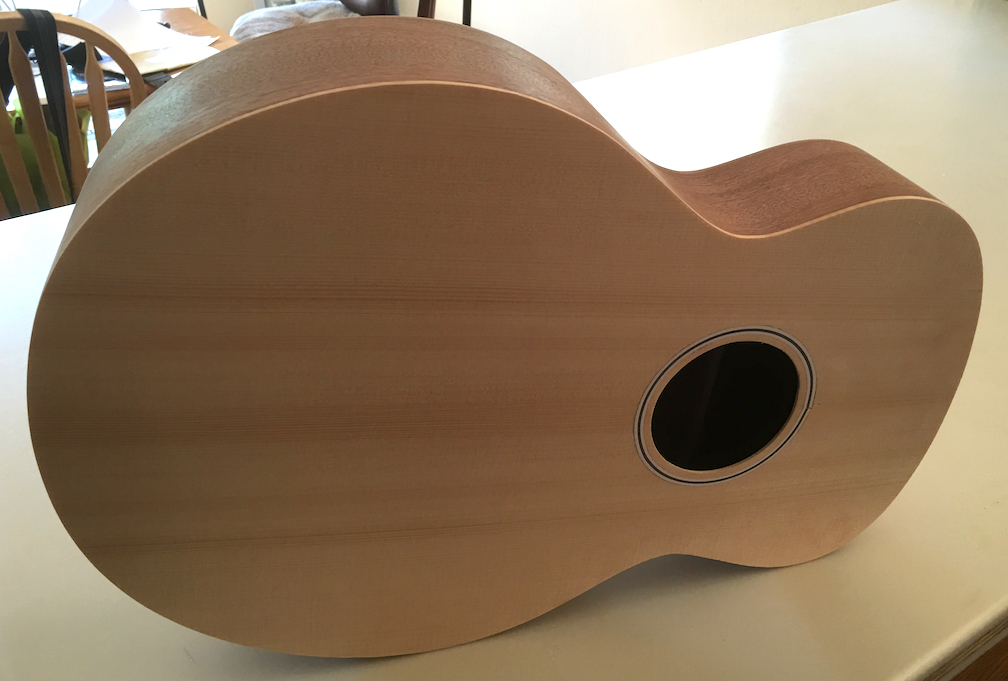
Progress... I had to make a bunch of spool clamps first, then I moved on to gluing up the front and back of the guitar. I made a handful of mistakes along the way...which isn't surprising. Things I'll be more careful of next time. Nothing that should affect me being able to complete this and make it a functional guitar. My goal is to have it play at least as well as my $350 Alvarez. Hopefully better, but this is primarily a learning experience. Next I'll add the binding and start making the neck. I'm going to have to buy fret wire and tuners before too long. Back glued on Front glued on Front & Back trimmed and exterior rough sanded...ready for binding? |
Author: | Pmaj7 [ Wed Aug 24, 2016 7:15 pm ] |
Post subject: | Re: Joe's L-1 Build |
JoeM wrote: My goal is to have it play at least as well as my $350 Alvarez. That's all about the setup. Assuming your basic geometry and neck construction etc. are okay. BTW looking good Joe! |
Author: | Bryan Bear [ Wed Aug 24, 2016 7:40 pm ] |
Post subject: | Re: Joe's L-1 Build |
Looking good! Nice and clean. |
Author: | Rodger Knox [ Wed Aug 24, 2016 10:16 pm ] |
Post subject: | Re: Joe's L-1 Build |
Looking good and making good progress. |
Author: | JoeM [ Wed Aug 24, 2016 11:51 pm ] |
Post subject: | Re: Joe's L-1 Build |
Thanks, it feels like slow going. I'm just trying to get a feel for what works well in terms of processes. It's fun though, and I'm eager to see how it sounds when it's done. I re-sawed some walnut that I'll probably use for #2, but I want to get this one finished before I start on it so I can plan out my work a little better. |
Page 1 of 3 | All times are UTC - 5 hours |
Powered by phpBB® Forum Software © phpBB Group http://www.phpbb.com/ |