Official Luthiers Forum!
http://mowrystrings.luthiersforum.com/forum/

motojerbear's build
http://mowrystrings.luthiersforum.com/forum/viewtopic.php?f=10134&t=38812
Page 1 of 2

Author:  motojerbear [ Mon Jan 07, 2013 10:38 pm ]
Post subject:  motojerbear's build

Hey guys and gals, I'm jumping in as well! This forum and it's contributors has been a huge inspiration for me, and also a well of practical and priceless knowledge, so THANK YOU ALL! I've built an electric from scratch so I'm not sure if this counts as #1 or #2, but either way I'm ready to dive into the world of acoustic.

The only design criteria I've got nailed down so far is this:

1) will be completed using hand tools only. This is mainly because I work in construction and am busy with power tools all day long. I want to come home and take the ear plugs out [uncle] I built the electric mentioned above with only hand tools so I've got a clue as to what I'm in for! I did cheat and use a drill press for the tuner holes, but to compromise, I did unplug it and take the belt off the drive spindle, and spun the chuck by hand :mrgreen:

2) I will build all parts of the guitar from raw materials. This does include tuners and truss rod. I've got a few ideas how to make this work.

3) I'll be purchasing a top, back and sides set. I'll be counting these as raw materials, as re-sawing them by hand could be too much for my ability levels at the thicknesses involved.

As for fears and uncertainties, radius-ing the top and back, as well as neck angle reign high on the list. My electric build was rather complex in design, (as I'm sure this axe will be :roll: ) and I made a huge but simple miscalculation in top height. Luckily it was an electric, so I just shimmed the (fully adjustable) bridge up. I will not have that luxury on this one.

So with that, I'm hitting the drawing board and looking for a good top, back and sides online. Good luck everyone!!!!
Author:  ZekeM [ Mon Jan 07, 2013 10:54 pm ]
Post subject:  Re: motojerbear's build

You may as well count this as number one for you. Acoustics are a very different beast than electrics. It's going to be interesting to see you use only hand tools! My best advice for you is to measure a hundred times and mock things up several times before gluing. This will ensure you get your angles and such correct. If you need any help on the truss rod holler at me. They are a simple gadget that's easy to make. Even the double action ones. Good luck and happy building!

Author:  motojerbear [ Wed Jan 09, 2013 1:46 am ]
Post subject:  Re: motojerbear's build

ZekeM wrote:
My best advice for you is to measure a hundred times and mock things up several times before gluing. This will ensure you get your angles and such correct. If you need any help on the truss rod holler at me.


I will heed your advice Sir! And look forward to bouncing ideas off you.

Ok, got my top & b/s ordered this morning, a couple of student sitka tops (two is one and one is none ;) ) and white oak for the b/s. I've seen a few builds lately with oak, and have become infatuated. Plus the price was right. I would hate to destroy something more exotic. Hopefully it bends as easily as I've read.

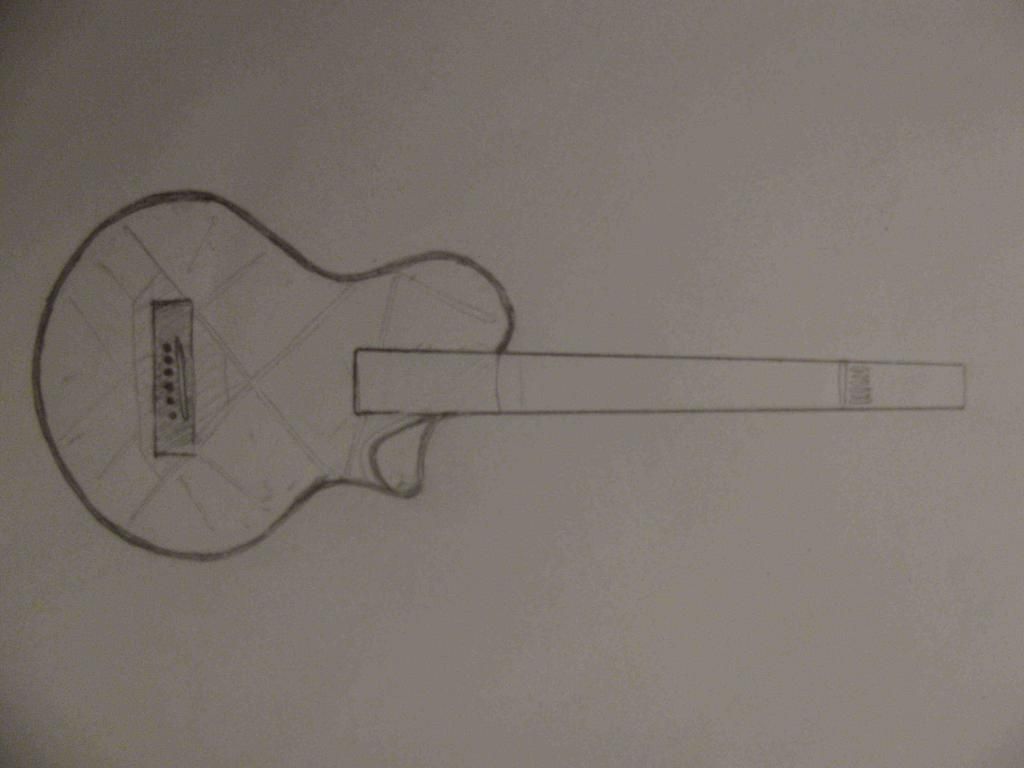
Speaking of bending...I will be using an electric bender, so I'll have to make allowances for one power tool. :D I'll be posting the wood pile pic as soon as I receive my order from RC tonewoods. The rest of the wood I think I've already got, well hopefully. I've got some bracewood, wenge for neck and bindings, and redheart or satine or bloodwood (not sure) for fret board and maybe bridge. Not really sure yet. Cleaned up the garage a bit tonight as well. Here's a pic of the sketch portraying the direction I'm heading.

Image

I love the shape but attaching the neck on this is going to be a bear. The sound hole is lower front bout. Saw this on a classical once and thought it kinda cool.

Author:  Tony_in_NYC [ Wed Jan 09, 2013 9:32 am ]
Post subject:  Re: motojerbear's build

It wont be hard to attach the neck, just make sure you can fit your hand in the soundhole!

Author:  ZekeM [ Wed Jan 09, 2013 10:32 am ]
Post subject:  Re: motojerbear's build

Tony_in_NYC wrote:
It wont be hard to attach the neck, just make sure you can fit your hand in the soundhole!

Or do a dovetail [xx(]

Also you may want to reevaluate your bracing a bit. That bridge plate is wayyyy too big IMO.

Author:  Rodger Knox [ Wed Jan 09, 2013 1:28 pm ]
Post subject:  Re: motojerbear's build

ZekeM wrote:
Tony_in_NYC wrote:
It wont be hard to attach the neck, just make sure you can fit your hand in the soundhole!

Or do a dovetail [xx(]

Also you may want to reevaluate your bracing a bit. That bridge plate is wayyyy too big IMO.


It's just a sketch, it needs a little more attention to getting it to scale. Lines from the nut to the outside pins on the bridge are off the edge of the neck, and that's worse than an oversize bridge plate.

Author:  ZekeM [ Wed Jan 09, 2013 2:32 pm ]
Post subject:  Re: motojerbear's build

Rodger Knox wrote:
ZekeM wrote:
Tony_in_NYC wrote:
It wont be hard to attach the neck, just make sure you can fit your hand in the soundhole!

Or do a dovetail [xx(]

Also you may want to reevaluate your bracing a bit. That bridge plate is wayyyy too big IMO.


It's just a sketch, it needs a little more attention to getting it to scale. Lines from the nut to the outside pins on the bridge are off the edge of the neck, and that's worse than an oversize bridge plate.


I understand it's a sketch but usually when you draw two things side by side they are pretty close to actual size relative to each other. I'd just hate for someone to glue a bridge plate on that's twice as big as it needs to be. I just thought id throw out a warning just in case. It's always better to say something to prevent an accident rather than to say something after its occurred.

Author:  Rodger Knox [ Wed Jan 09, 2013 3:54 pm ]
Post subject:  Re: motojerbear's build

You're right, it's much easier to fix on paper than after wood is cut.

That's a pretty cool shape, but you really need to work out exactly how the neck is connected. Those angles and the cutaway won't work with a normal headblock, so you need to work out how they will fit together. I've seen similiar things, so it's not unreasonable, but the further off the beaten path you go, the fewer the number of people that have experience with what you're trying to do, so you may not be able to get much help.

Author:  WudWerkr [ Wed Jan 09, 2013 4:08 pm ]
Post subject:  Re: motojerbear's build

Quote:
Also you may want to reevaluate your bracing a bit. That bridge plate is wayyyy too big IMO.


Also , recognizing that its all on paper and just a sketch , Ive always had a bit more of the Bridge ends on the x brace , IE : X passing more around center point of bridge end ? Does it matter ?

Author:  motojerbear [ Wed Jan 09, 2013 8:58 pm ]
Post subject:  Re: motojerbear's build

Thanks for all the critiques on the design. I knew I should of erased all the bracing stuff before shooting a pic of it laughing6-hehe I was actually drawing and erasing back and forth between different schemes and that's just where I happened to leave off.

The giant bridge plate idea was kinda stolen from Petros guitars
[url]http://www.petrosguitars.com/features.htm/url] (click on bridge plate) but mine is even way to big in that regard.

I'm working on a full scale drawing so I can get started on forms and such, so I'll definitely post that when finished so you guys can steer me in the right direction.

Rodger Knox wrote:
... you really need to work out exactly how the neck is connected. Those angles and the cutaway won't work with a normal headblock, so you need to work out how they will fit together. I've seen similiar things, so it's not unreasonable, but the further off the beaten path you go, the fewer the number of people that have experience with what you're trying to do, so you may not be able to get much help.

You're right on with this. I enjoy the unbeaten path a little too much and it usually bites me!

Author:  Rodger Knox [ Thu Jan 10, 2013 1:53 pm ]
Post subject:  Re: motojerbear's build

Check this out. I knew your shape looked familiar, it's not too different from this one.
viewtopic.php?f=10133&t=37219&st=0&sk=t&sd=a
Now you know who to ask about the neck connection. [:Y:]

Author:  Bryan Bear [ Sat Jan 12, 2013 10:07 pm ]
Post subject:  Re: motojerbear's build

I like that shape. The neck arrangement is not unlike the challenge mando I just did. You can look at my thread and see the neck block arrangement. The bass side is similar to a Spanish heel and the trebble side is pretty standard for a cutaway. Your bass side curve is less drastic so that should help; my clamp up didn't go as planned and I had to act fast to get everything to work. I ended up with a slightly different shape than I had drawn. . . You need to figure out the fretboard width at the neck joint. The heel block (measured from the inside of the bass side kerf) to the trebble side needs to be the FB width minus the side thickness. I actually went very slightly Wider. Then I did the final carve of the neck heel with it mounted and thinned the side at the same time so they were flush.

Author:  motojerbear [ Sun Jan 13, 2013 2:12 pm ]
Post subject:  Re: motojerbear's build

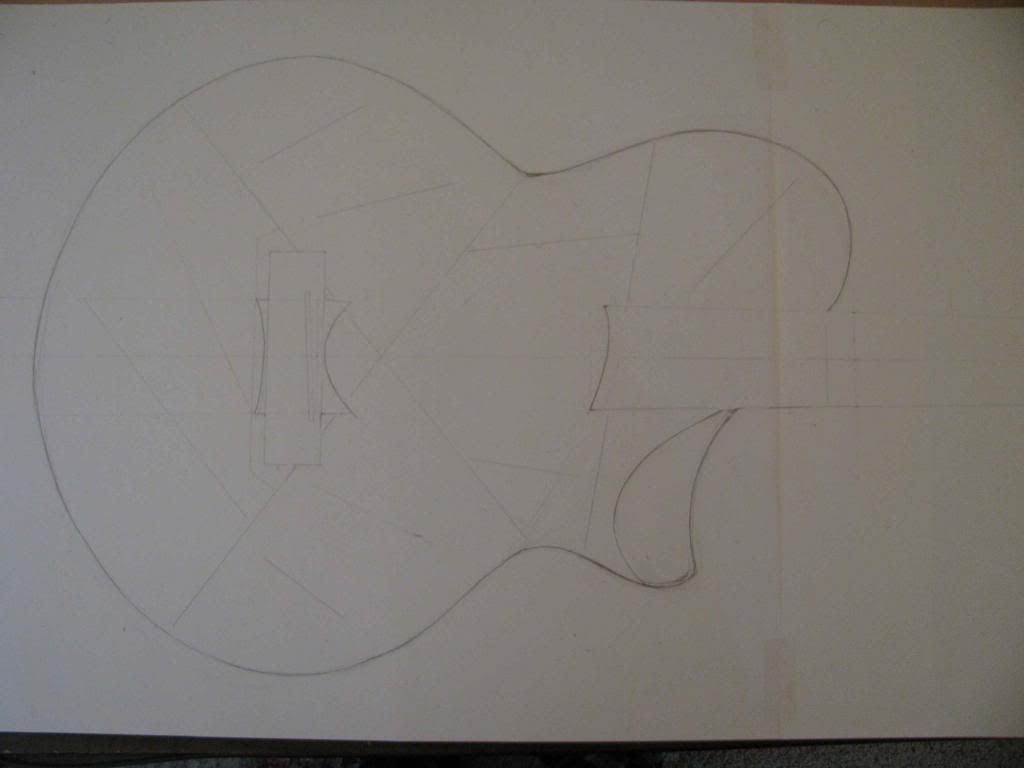
Ok, got the first full scale size drawing done...

Image

edit: the bridge is perpendicular to the guitar centerline...the angle of the photo kinda skews it I think

The straight lines are the centerline of proposed braces. I have to admit that I drew them on
almost completely based on right brain reasoning. If there is any fatal flaws I would be interested in hearing about them.
I'll study some braced top pics and see if anything pops out at me, before changing this from
full scale drawing to full scale plan.

Rodger Knox wrote:
Check this out. I knew your shape looked familiar, it's not too different from this one.
http://www.luthiersforum.com/forum/view ... &sk=t&sd=a
Now you know who to ask about the neck connection. [:Y:]
I love Chris' shape! I do need to study his neck conection...

WudWerkr wrote:
Also , recognizing that its all on paper and just a sketch , Ive always had a bit more of the Bridge ends on the x brace , IE : X passing more around center point of bridge end ? Does it matter ?
I think I got the x braces a little closer. Is this more what you where talking about?

Bryan Bear wrote:
I like that shape. The neck arrangement is not unlike the challenge mando I just did. You can look at my thread and see the neck block arrangement. The bass side is similar to a Spanish heel and the trebble side is pretty standard for a cutaway. Your bass side curve is less drastic so that should help; my clamp up didn't go as planned and I had to act fast to get everything to work. I ended up with a slightly different shape than I had drawn. . . You need to figure out the fretboard width at the neck joint. The heel block (measured from the inside of the bass side kerf) to the trebble side needs to be the FB width minus the side thickness. I actually went very slightly Wider. Then I did the final carve of the neck heel with it mounted and thinned the side at the same time so they were flush.
I'd be lying if I said that I didn't read your build thread right before sketching this shape :shock: :oops: :D
Thanks for all the insights guys!

jeremy

Author:  ZekeM [ Sun Jan 13, 2013 3:03 pm ]
Post subject:  Re: motojerbear's build

From the size of your soundhole I'm assuming you will have a Spanish heel? It looks hard to get your hand in there for a bolt on.

Author:  motojerbear [ Sun Jan 13, 2013 6:24 pm ]
Post subject:  Re: motojerbear's build

ZekeM wrote:
From the size of your soundhole I'm assuming you will have a Spanish heel? It looks hard to get your hand in there for a bolt on.


Hey Zeke, I'm still not sure how I'm going to attach the neck on this thing idunno
As far as fitting my hand in the hole, I'm hoping that will be possible by cutting down
the side/lower front bout with the same arc as cut into the top. Basically giving the hole
a "fish mouth" shape. That should give me enough clearance... famous last words... plus
give me greater access to the higher frets when playing.

Do you know if there is much tension/pressure on that side/bout area when it is strung up?
Should I beef up that area somehow?

Thanks for your input
jeremy

Author:  PeterF [ Mon Jan 14, 2013 5:23 am ]
Post subject:  Re: motojerbear's build

Have I got this right, in that the soundhole is the cutaway side area? If so, that would look very cool, but wouldn't it affect the sound in some way as well as being a structural nightmare?

Author:  ZekeM [ Mon Jan 14, 2013 7:29 am ]
Post subject:  Re: motojerbear's build

I'm sure there are others here with much more valuable input on the stresses induced on the upper bout area. That said I believe there are a lot of stresses in that area. The headblock especially carrying the weight from the neck. On my current build I made an assumption that by using a large L shaped headblock I would not need an upper transverse brace, especially since I wasn't gluing the fingerboard to the soundboard. I was quickly corrected and advised to brace that area because others who had done similar bracing to mine had the top crack with the grain lines at the edge of the headblock. If I were you I would make sure the area has sufficient bracing to transfer the stress from the headblock out horizontally across the soundboard and to the sides.

Author:  Bryan Bear [ Mon Jan 14, 2013 11:58 am ]
Post subject:  Re: motojerbear's build

Okay, now I'm confused. I assumed the soundhole was not in the picture; am I understanding that the second curve at the cutaway is the soundhole? Bear in mind I am no engineer, that looks like a bad idea to me (if I am understandig right). Is the top in that area going to have not connection to the side at the cutaway? Guitars try to fold themselves up between the saddle and the heel block. Having the skin (top) attached all around the perimiter goes a long way in keeping this from happening but even that is not enough on its own. If you are planning to not have the edge of the top next to the heel block just hanging out in space you are asking for trouble IMHO.

If I am misunderstanding you design, please ignore my ramblings above.

Author:  motojerbear [ Mon Jan 14, 2013 9:37 pm ]
Post subject:  Re: motojerbear's build

PeterF wrote:
Have I got this right, in that the soundhole is the cutaway side area? If so, that would look very cool, but wouldn't it affect the sound in some way as well as being a structural nightmare?

ZekeM wrote:
I'm sure there are others here with much more valuable input on the stresses induced on the upper bout area. That said I believe there are a lot of stresses in that area. The headblock especially carrying the weight from the neck.

Bryan Bear wrote:
Okay, now I'm confused. I assumed the soundhole was not in the picture; am I understanding that the second curve at the cutaway is the soundhole? Bear in mind I am no engineer, that looks like a bad idea to me (if I am understandig right). Is the top in that area going to have not connection to the side at the cutaway? Guitars try to fold themselves up between the saddle and the heel block. Having the skin (top) attached all around the perimiter goes a long way in keeping this from happening but even that is not enough on its own. If you are planning to not have the edge of the top next to the heel block just hanging out in space you are asking for trouble IMHO.

If I am misunderstanding you design, please ignore my ramblings above.


You are understanding correctly, and I hear y'all loud and clear . I was afraid that it was a bad idea. I saw this done on a classical (which I understand has less than half the string tension now to that of a steel string,) and will probably shelf this design and save it for a classical when I understand a bit more about guitar architecture. Thank you guys for steering me clear of that...Back to the drawing board :roll: :D

Author:  ZekeM [ Mon Jan 14, 2013 9:55 pm ]
Post subject:  Re: motojerbear's build

No need to necessarily start over. Why not just move the hole in from the side slightly. Maybe leave an inch between the hole and the side still using the same shape. Just a suggestion. Just be sure to add some reinforcement on the back of the soundhole area. That would ensure you are tied into the sides all the way around while still achieving the same basic look. I think that should work.

Bryan do you agree that could solve the problem?

Author:  Bryan Bear [ Mon Jan 14, 2013 10:58 pm ]
Post subject:  Re: motojerbear's build

Don't do a drastic redesign just yet. There are several hundred members here that can give better advise on this than I. . . Let's get some more input. If you have seen it on a classical, there MAY be a way to make it structurally sound. I just don't want you to get too deep into a design flaw.

Author:  motojerbear [ Wed Jan 16, 2013 8:57 am ]
Post subject:  Re: motojerbear's build

No worries guys, still fully in the design mode. Starting completely over isn't really losing that much ground.

I've been reading Cumpiano's blog a bit, and just got his book in the mail yesterday. I spent last evening
going through "guitarmaking" in a quick survey fasion, and my focus for this first acoustic build is shifting
toward a much more traditional style. Here's where I'm headed:

-symmetrical body shape (no cutaway) and centered soundhole, probably a smallish body size
-a slotted headstock (also shelving tuner design for the time being) so I'll be buying those now
-sitka top, white oak back and sides with swamp ash binding (all light colored woods for body)
-wenge and sitka lam neck with wenge fretboard and headstock (all dark colored woods, from the front anyway)
-hand rubbed oil finish, no grain filler for an open/ ruff/ mat look and feel (wenge, swamp ash and oak are open ruff)
-no inlay or decoration aside from side fretboard markers (as I'd be lost without them) laughing6-hehe

When I was in the market to buy my first acoustic a few decades ago, I came across a Norman with this color
scheme, minimal decor and and mat finish. The sound of the guitar was even and pleasant to my untrained
ears and simple tastes, and the price was right. I didn't buy, went back a few days later to, and it was gone.
It might be "the one that got away" for me. Or it could have been a sub-par guitar, and I didn't miss much
missing it. Either way, I think about it all the time.

So, changing directions, I'll set out to build a guitar that embodies the character of that Norman. This will also
up the chances that my first acoustic build will end up actually playable. As I play for my church every so often
I'll include a simple piezo under saddle, with all preampage outside of the guitar.

I caught this on Cumpiano's blog...
"The secret of consistent excellence in guitarmaking lies among the following, if anywhere:
·       Architectural optimization: minimum adequate structure: like Ervin Somogyi once said, “guitars sound best when they are built just beyond the cusp of collapse
·       Precision and control of the guitar’s three-dimensional geometry
·       All tonewoods selected for even, uniform, texture and fiber organization
·       Forget the specie. The most expensive, exotic, and rare hardwoods add not a whit of tonal advantage over inexpensive and plentiful alternatives. Experiment with local materials. One of the great, unknown domestic hardwoods of the future is mid-western Sycamore.
·       Soundboards should be selected for predominance and proliferation of medullar rays (“silk”) over all other factors. This feature reveals the material at the peak of its architectural efficiency (i.e., its stiffness/mass ratio)."

While I don't believe every word that anyone says, I think I'm pretty good at recognizing wisdom
when I see/ hear it. In the spirit of this small list of "do's", I'm shifting my focus from pure innovation
in my design to simple precision, architectural optimization etc.

Rambling accomplished! Bam! [clap]
Thanks Guys

jeremy

Author:  ZekeM [ Wed Jan 16, 2013 10:21 am ]
Post subject:  Re: motojerbear's build

Sounds like a good redesign you have there. I think your change of focus will result in a much more playable instrument. It's good to focus on the basics with your first build. Only thing you may want to reconsider is Sitka for a neck wood. If you are just wanting a light colored strip it may be ok, but necks have a tendency to want to bend and warp as is so you may want to consider another, stronger wood for this, perhaps maple.

Author:  Casey Cochran [ Wed Jan 16, 2013 10:43 am ]
Post subject:  Re: motojerbear's build

I also think that your change of direction is a prudent decision. Your odds of a successful result have greatly increased. Building a guitar or two with more traditional architecture will help you when you start thinking outside the box. Have fun!

Author:  Bryan Bear [ Wed Jan 16, 2013 11:34 am ]
Post subject:  Re: motojerbear's build

I agree, as much as I like the shape you started with, your chances of sucess just went way up. good luck, I'll be watching.

Down the road, when you get around to the other shape, make sure you post it here.

Page 1 of 2 All times are UTC - 5 hours
Powered by phpBB® Forum Software © phpBB Group
http://www.phpbb.com/