Official Luthiers Forum!
http://mowrystrings.luthiersforum.com/forum/

shooting board troubles
http://mowrystrings.luthiersforum.com/forum/viewtopic.php?f=10102&t=548
Page 1 of 1

Author:  Michael Dale Payne [ Thu Dec 30, 2004 3:09 am ]
Post subject: 

When I joint Spruce using my shooting board I have to fine tune high spots repeditivly to close the joint 100%. The last top I jointed took four hours or better to close 100%... I rarly have to do this more than once or twice on harder woods. Does anyone have any thoughts on this problem?

Author:  Sprockett [ Thu Dec 30, 2004 3:18 am ]
Post subject: 

A couple Michael..

First what type of plane are you using?

I *used* to use a #5 jack plane and had the same issue, but I finally gave in and purchased a lie-nelson low angle jointer and I will *never* ever use anything else to join tops and backs. I can do it 5 passes, no kidding.

Second is how close are your pieces when you start?, I run mine on the jointer to get them at least in the ballpark and then finish them up by hand, you can also use the table saw to get them at least close if you take just a little off.

Third if all else fails I have a straight edge clamp used for sawing (it's extruded aluminum) that's perfectly straight and I have glued 150 grit paper to one side and use that when I run into wood that tears out too much. Just blow out the joint before you glue them up, not as good as using a plane but I keep it around for stubborn pieces. I can post a pic if you would like..

Cheers

-Paul-


Author:  Michael Dale Payne [ Thu Dec 30, 2004 3:38 am ]
Post subject: 

[QUOTE=Sprockett] A couple Michael..

First what type of plane are you using?

I *used* to use a #5 jack plane and had the same issue, but I finally gave in and purchased a lie-nelson low angle jointer and I will *never* ever use anything else to join tops and backs. I can do it 5 passes, no kidding.

Second is how close are your pieces when you start?, I run mine on the jointer to get them at least in the ballpark and then finish them up by hand, you can also use the table saw to get them at least close if you take just a little off.

Third if all else fails I have a straight edge clamp used for sawing (it's extruded aluminum) that's perfectly straight and I have glued 150 grit paper to one side and use that when I run into wood that tears out too much. Just blow out the joint before you glue them up, not as good as using a plane but I keep it around for stubborn pieces. I can post a pic if you would like..

Cheers

-Paul-

[/QUOTE] I am using a 50 year old 14" #7 Stanly jointer that was my grandfathers. It is in pristine condition... He would come down from heaven and strike me with a bolt of lightning if I let it be otherwise. I true the non-jointed long edges and one side using a #5 so that they will index against my edge stops on my jig. I shoot till joint edges are equal then start checking the joint. This usally takes six passes or so.

Author:  LanceK [ Thu Dec 30, 2004 3:48 am ]
Post subject: 

I've never had any luck with planes, probably me. I use the stewmac leveling bars, I have the 18" IIRC? I put some 120 grit PA paper on the edge, clamp the two show sides together, place them on a piece of 1/4" ply, and clamp the whole thing down to my table saw, in less than a minute i get a perfect joint, I may have to hit it again, depending on how well they were matched before had. Using a jointer first is a good idea as Paul said, trouble is my joiner sucks!

Author:  Michael Dale Payne [ Thu Dec 30, 2004 3:55 am ]
Post subject: 

[QUOTE=LanceK] I've never had any luck with planes, probably me. I use the stewmac leveling bars, I have the 18" IIRC? I put some 120 grit PA paper on the edge, clamp the two show sides together, place them on a piece of 1/4" ply, and clamp the whole thing down to my table saw, in less than a minute i get a perfect joint, I may have to hit it again, depending on how well they were matched before had. Using a jointer first is a good idea as Paul said, trouble is my joiner sucks![/QUOTE] You have never had any problems with joint contamination from the release agent in the silaca oxcide? I had one of the first tops I jointed fail when I used sanding method. It was probably cheap sand paper.

Author:  LanceK [ Thu Dec 30, 2004 4:06 am ]
Post subject: 

Knock on wood! NO! all my joint have been fine, save for one I joined in 90% rh, then took it to the basement shop were the RH is 45, crack!

Author:  Michael Dale Payne [ Thu Dec 30, 2004 4:08 am ]
Post subject: 

[QUOTE=LanceK] Knock on wood! NO! all my joint have been fine, save for one I joined in 90% rh, then took it to the basement shop were the RH is 45, crack![/QUOTE] OOOPS...........

Author:  Sprockett [ Thu Dec 30, 2004 4:23 am ]
Post subject: 

Lance you gotta try one of the jointer planes, it makes all the difference in the world. My youngest son and I are building D-18s together and I had him joining tops in no time. the one I bought is the cheapest Lie-Nelson makes in that area and it worked right out of the box (I love their products).

Why it's so simple even *I* can use it!!

Record and Stanley make them as well and I know lee valley has some that are less that the Lie-Nelson ones, but the difference is that you would have to set those up, the Lie-Nelsons are perfect out of the box.

There are some tools you can't skimp on and hand planes are one of them, I stopped sanding tops together because the joint is not as good as a planed one and Michael I have not heard of silica being an issue. Like I said I blow out the joint before I glue them and use hot fresh hide glue to do them.

Cheers

-Paul-


-Paul-

Author:  Sprockett [ Thu Dec 30, 2004 4:34 am ]
Post subject: 

[QUOTE=MichaelP] I am using a 50 year old 14" #7 Stanly jointer that was my grandfathers. It is in pristine condition... He would come down from heaven and strike me with a bolt of lightning if I let it be otherwise. I true the non-jointed long edges and one side using a #5 so that they will index against my edge stops on my jig. I shoot till joint edges are equal then start checking the joint. This usally takes six pbuttes or so.[/QUOTE]

That should be perfect then, I wouldn't even bother with the #5, if they are really misshapen I would put them in the jig on the opposite side of the joint and take fairly deep cuts with the #7 to get the backs at least semi flat.

Then I'd flip them over and start with fairly heavy cuts until the pieces where close, then I'd start pulling back the blade on each pbutt until I got whisper thin shavings. One trick I learned is that when I'm shooting I look at the joint as it sits on the plane and I can tell if I have more work to do.

Another trick that took some practice was to stop working the plane, in other words the point of a jointer plane is to make a piece perfectly flat. I used to push all the way through the stroke, but I learned the hard way to push on the front to start the cut and then on the back once fully engaged. This stopped me from digging out one side.

The other thing is to make sure that the planes sole is perfectly flat, that could cause problems too.

Hope this is helping...

-Paul-

Author:  Don A [ Thu Dec 30, 2004 4:36 am ]
Post subject: 

[QUOTE=LanceK] I've never had any luck with planes, probably me. I use the stewmac leveling bars, I have the 18" IIRC? I put some 120 grit PA paper on the edge, clamp the two show sides together, place them on a piece of 1/4" ply, and clamp the whole thing down to my table saw, in less than a minute i get a perfect joint, I may have to hit it again, depending on how well they were matched before had. Using a jointer first is a good idea as Paul said, trouble is my joiner sucks![/QUOTE]

Anyone ever try using their router table?

Author:  Sprockett [ Thu Dec 30, 2004 4:38 am ]
Post subject: 

[QUOTE=Don A] [QUOTE=LanceK] I've never had any luck with planes, probably me. I use the stewmac leveling bars, I have the 18" IIRC? I put some 120 grit PA paper on the edge, clamp the two show sides together, place them on a piece of 1/4" ply, and clamp the whole thing down to my table saw, in less than a minute i get a perfect joint, I may have to hit it again, depending on how well they were matched before had. Using a jointer first is a good idea as Paul said, trouble is my joiner sucks![/QUOTE]

Anyone ever try using their router table?[/QUOTE]

I've heard of it being done and I've also talked to people who use their jointer, but my issue is that those are spinning blades and the cut you get is not as good as a well tuned hand plane. On my jointer I can see little ridges where it cut the piece and on a top joint you really want wood to wood contact with no gaps. I would use sandpaper before I used a jointer or a router for this.

But that's just my opinion

-Paul-

Author:  Dickey [ Thu Dec 30, 2004 5:38 am ]
Post subject: 

I have used everything in the shop. My Atlas 6 inch jointer is my main tool. I too have attempted shooting with a #7 Stanley, works pretty good. But I joint with the Atlas, then lay down two pieces of 180 grit red garnet paper, wipe off dust, check join at the window and make a tent using tape and hit with hot hide glue, done.

Author:  Brock Poling [ Thu Dec 30, 2004 5:50 am ]
Post subject: 


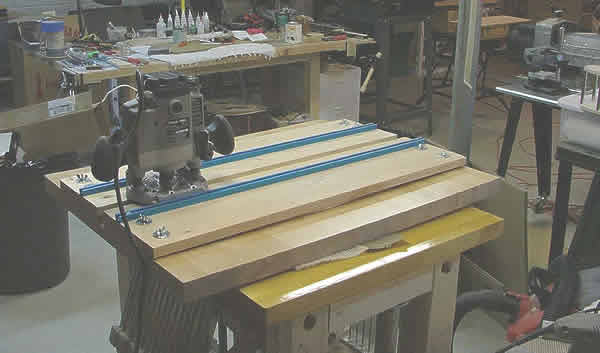
I have made a jig that I use with my router. It works dead on 100% of the time with hard woods for the backs, but tops are a little fussier. I usually touch them up with a hand plane.

However, I am interested in knowing Paul, what type and # plane are you using. I have been thinking about switching to hand jointed edges for my tops.

Here is my jig.


Author:  Sprockett [ Thu Dec 30, 2004 7:03 am ]
Post subject: 

[QUOTE=bpoling]
I have made a jig that I use with my router. It works dead on 100% of the time with hard woods for the backs, but tops are a little fussier. I usually touch them up with a hand plane.

However, I am interested in knowing Paul, what type and # plane are you using. I have been thinking about switching to hand jointed edges for my tops.

Here is my jig.


[/QUOTE]

Cool Jig...

Here is the link to the one I'm using:

http://www.lie-nielsen.com/tool.html?id=7_5

It's a low angle #7 jointer, the blade is 1/4" thick and it cuts rosewood like butta! which is the hardest for me to cut, I just did a cocobolo set last night and I finally had to set the plane to take off minute amounts to keep the cocobolo from tearing on the edge but the whole process of getting the edges clean still only took about 10 minutes.

I can't say enough about the quality of their tools, I know they are expensive but IMHO they are worth every penny you pay. It certainly made joining tops a much easier process for me...

Cheers

-Paul-

Author:  Brock Poling [ Thu Dec 30, 2004 9:12 am ]
Post subject: 


I have a Woodcraft gift cert that is looking for something to claim it.

Author:  Dickey [ Thu Dec 30, 2004 11:01 am ]
Post subject: 

Brock that is a nice jig, can you explain it? I see that both right and left bookmatches are clamped down. What kind of router bit? Thanks in Advance. Nice looking setup.

Author:  Brock Poling [ Thu Dec 30, 2004 11:33 am ]
Post subject: 


Sure. The bottom board is a 1.75" butcher block cut off. I routed a dado in it about 1" wide and .75" deep. in the center of the board. I marked a centerline in the bottom of the dado.

Then I mounted the top two clamping boards (pine sealed with shellac). They loosen and tighten with the wing nuts on each end. The bolts run all the way through the bottom and top board.

The bookmatched guitar plates are sandwitched between the bottom board and the top clamp assembly. The seam is eyball lined up over the center line and the boards are snugged down firm (not tight, just firm).

Then a router is run between the rails. I use a 1/4" spiral down cut bit in this and take about half the bits cut from each plate.

One pass does the trick.

I fussed with this set up so the cut is dead on straight. You can't get any light between these cuts and a straight edge.

However, even if it wasn't 100% perfect it would still work very well, because any in accuracy on one plate will create the mirror image of the inaccuracy on the other plate and you will end up with a seam that fits together like a puzzle piece.

I built this because (at the time) I didn't have a nice jointer, but now that I have one I still find myself using this jig because it is so reliable.

Author:  Dickey [ Sat Jan 01, 2005 3:19 pm ]
Post subject: 

Brock, this is the best "new technology" or technique for joining tops backs, and hey, just anything. I will build one of these the next time I need to joint anything. I keep 1/4 inch carriage bolts and wing nuts on hand for this very reason.

Thank you for sharing this. I just know in my knower that this is a great tool set up.

Might I suggest you do a photoessay and drop it in the tools and jigs section of the OLF?

Great little setup. I wonder if a replaceable sacrifice strip might work well in the place of the dado for support during the cut. Might cut down on vibration at the cut? I know when drilling holes, drilling over a sacrifice board, makes a better hole with little tearout.

Page 1 of 1 All times are UTC - 5 hours
Powered by phpBB® Forum Software © phpBB Group
http://www.phpbb.com/