Official Luthiers Forum! http://mowrystrings.luthiersforum.com/forum/ |
|
My Binding Jig http://mowrystrings.luthiersforum.com/forum/viewtopic.php?f=10102&t=14429 |
Page 1 of 1 |
Author: | KiwiCraig [ Thu Nov 08, 2007 11:29 am ] |
Post subject: | |
I made this a few years ago and got the basic idea from the Jim Williams book, but have made a number of changes . Arnt has one similar as well. 
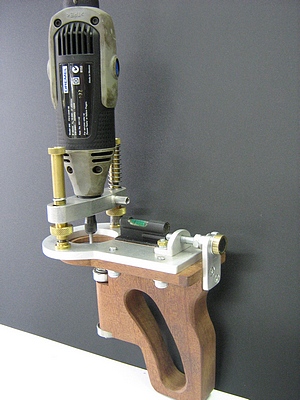
I have stuck with my dremel as the power source , so as to not make it too top heavy. Despite what others have said, I find it to have ample power for the job, but I do it in two passes. I also have the power cord hung from a ceiling hook , so that the unit is not pulled in any direction. I use the bit shown for the binding ledge , but change to a 1/8 " spiral downcut for the purfling ledge ( shellac the soundboard edge first too ! ) The donut piece I've eventually decided on ( about 1 1/2 " diameter ) , is small enough to not alter the depth of cut , yet wide enough so I can still feel the unit to be upright, with both sides of the donut contacting the surface. With a very small donut , you can easily tip the thing. I have also chamfered the front of it enough to clear the back/top radius. 
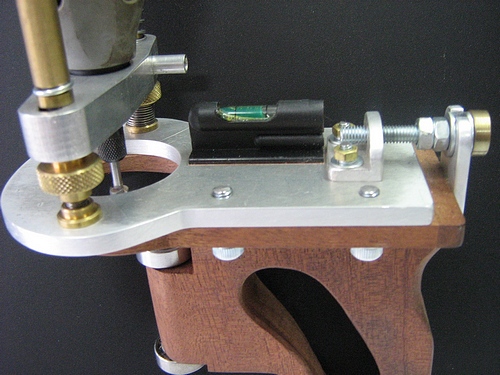
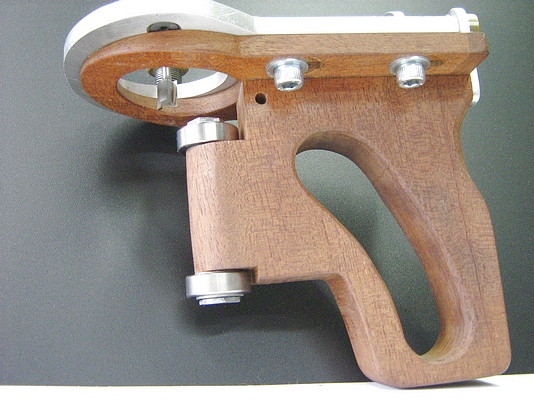
This unit utilizes the top half of my Stewmac router base , which I simply unscrew when required . It is micro adjustable in hieght ,thanks to Stewmac , and also micro adjustable in cutting depth. I undo the four hex head screws on the underside of the unit , then adjust the alumimium mounting plate ( which rides on the Mahogany base ) to or fro with the adjusting wheel at the end of the unit.Relock the 4 hex head screws. 
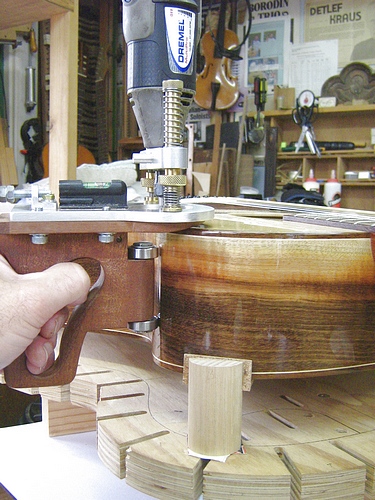
For the purpose of the photo , I used my already bound guitar as the subject ![]() 
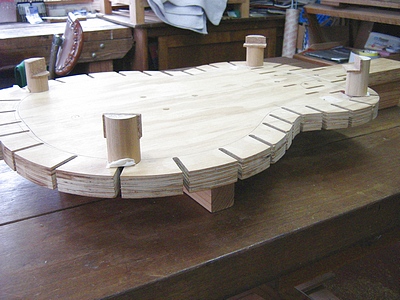
Also pictured is the platform I use to hold the guitar during this operation. This arrangement allows enough clearance for the bearing to register against the sides and also holds the guitar very firm. Hope this may help anyone making up a binding jig. ![]() ![]() ![]() ![]() ![]() The whole system works very well ! ![]() Cheers , Craig Lawrence |
Author: | TommyC [ Thu Nov 08, 2007 11:30 am ] |
Post subject: | |
Awesome Craig. It looks very functional. Thanks for posting. |
Author: | PDeWitt [ Thu Nov 08, 2007 11:54 am ] |
Post subject: | |
This looks great, Craig. It seems like it might take the place of a more extensive binding jig. Did you get the handle from somewhere, or make it yourself? The Dremel holder is from StewMac. Where did you get the ball bering rollers for following the sides? Thanks! |
Author: | KiwiCraig [ Thu Nov 08, 2007 12:06 pm ] |
Post subject: | |
Appreciated Peter and Tommy, I made everything out of scrap I had hanging around .I bought the little bearings from an engineering crowd in our small town and bolted them to the handle and platform setup I fabricated. Cheers Craig Lawrence |
Author: | Bill Greene [ Thu Nov 08, 2007 12:09 pm ] |
Post subject: | |
That's possibly the coolest thing I've ever seen...it's like a binding gun. I love it. |
Author: | PDeWitt [ Thu Nov 08, 2007 12:10 pm ] |
Post subject: | |
I didn't put that together, but I think that is part of the reason I like this so much too! |
Author: | Hesh [ Thu Nov 08, 2007 1:53 pm ] |
Post subject: | |
[QUOTE=Bill Greene]That's possibly the coolest thing I've ever seen...it's like a binding gun. I love it. [/QUOTE] Exactly what I thought Bill - this is like the Walther PPK that Bond uses - first rate!!! ![]() ![]() ![]() ![]() |
Author: | Hesh [ Thu Nov 08, 2007 1:55 pm ] |
Post subject: | |
[QUOTE=fmorelli]If you have a highly figured side that is not smoothly bent in the waist (due to the figure, let's say), wouldn't the bearing tracking that side cause a bounce in the binding cut? Filippo[/QUOTE] Filippo buddy that is why it is so very important to true the sides with a sanding block before cutting the binding channels. You are right though, if the sides are not perfectly uniform the binding channels will not be uniform either. |
Author: | KiwiCraig [ Thu Nov 08, 2007 3:42 pm ] |
Post subject: | |
No ! I have the undulation thing covered. Before cutting the ledge , I do a dry run around the edge to see if there are any . This is the reason for the spirit level . It'll move at the slightest undulation and let me know where it is precisely . My last guitar had none ,but my previous one ,which was Mahogany, did have a couple of little spots ( Mahogany can do that to you ! ![]() It works very well ! No gaps in my binding /purfling , and they are of constant height and thickness all the way around the body Cheers Craig Lawrence |
Author: | Arnt Rian [ Thu Nov 08, 2007 8:32 pm ] |
Post subject: | |
Very nice, Craig! I'm rebuilding mine to fit a PC 310 trimmer, and I'll add a depth adjustment similar to yours. As I have said before, I think these jigs work better if you feed the guitar to the tool and not the other way around. The spirit level thing is cool though; at first I thought it was a joke, then I thought "hmmm, that thing probably works"! |
Author: | bob J [ Thu Nov 08, 2007 9:17 pm ] |
Post subject: | |
My, aren't we the busy machinist? What an incredible and useful combo for a luthier. To machine jig parts to exact measurements and not have to pay $$ for someone else to accomplish the fact. ![]() ![]() ![]() |
Author: | KiwiCraig [ Thu Nov 08, 2007 9:19 pm ] |
Post subject: | |
Cheers Arnt, Yes the spirit level is a crucial part of the operation . I dry run it a number of times , keeping my eye close on the level, until I'm satisfied of cutting a perfect ledge. If the sided are level sanded correctly ,there shouldn't be an issue , but if there was ,bcause of the type of wood used ,or whatever, masking tape , being a tenth of a MM. thick, can closely fill any minor undulation where the registering bearing runs . Yes , I've tried your method of having the unit fixed ,and move the instrument around , ( as do some factories as well ) , but it doesn't suit me . I like seeing the cut taking place right in front of me , and feel I have more control that way and maybe more confidence,,,tool in hand. I must say this : What ever works is ALL GOOD ! ![]() Cheers, Craig Lawrence |
Author: | Bruce Dickey [ Fri Nov 09, 2007 12:41 am ] |
Post subject: | |
really nice looking tool. ![]() |
Author: | JHerrick [ Fri Nov 09, 2007 1:08 am ] |
Post subject: | |
That's really nice, thanks for sharing it with us! How's the two flute bit work out for you? Do you just regularly hone it? Seems like had a bit of tear out with mine and went to spiral bits. I just REALLY don't want any tear out at this stage of the build if I can avoid it. Joe |
Author: | Dave Anderson [ Fri Nov 09, 2007 1:09 am ] |
Post subject: | |
That's a very impressive jig Craig! |
Author: | charliewood [ Fri Nov 09, 2007 5:35 am ] |
Post subject: | |
Thats one nicely engineered jig my friend! Wow! You are the man! Cheers Charlie |
Author: | KiwiCraig [ Fri Nov 09, 2007 10:22 am ] |
Post subject: | |
fmorelli, I have that issue covered ! . READ my above posts ![]() ![]() Cheers Craig Lawrence |
Author: | KiwiCraig [ Fri Nov 09, 2007 2:38 pm ] |
Post subject: | |
Cheers Bob,Bruce ,Dave and Charlie ! Joe , I get those bits from stewmac ( 5/16 ' ) . I think they are about $17 each . Yes you can touch them up with a diamond stone , but best when new I swap over to the spiral downcut bits for the purfling ledge. They seem to keep their edge longer. Cheers Craig Lawrence |
Page 1 of 1 | All times are UTC - 5 hours |
Powered by phpBB® Forum Software © phpBB Group http://www.phpbb.com/ |