General Description
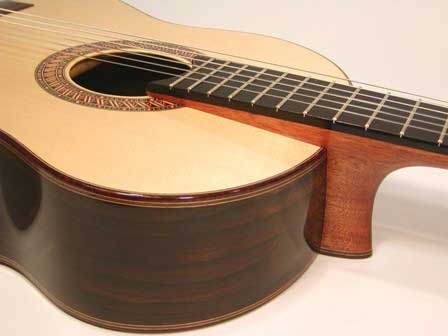
The following describes a method to construct an elevated fingerboard on a classical guitar. The result is an upper bout in the style of Byers and others, where the neck/fingerboard assembly sits above a soundboard that dips below the plane of the lower bout (Fig. 1). I have not seen how other builders execute their elevated fingerboards, but the method I developed works well and overcomes several technical hurdles in obtaining correct neck angle and head placement.
Fig. 1. Finished guitar.
The angle in the neck extension that creates the elevation over the upper bout continues past the body where it meets the heel block. Therefore, the top of the heel block has an angle that is complementary with that of the neck extension.
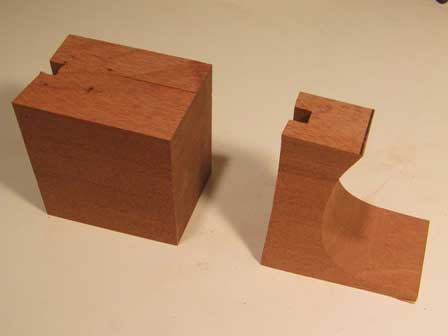
The neck/body joint uses a spline. The original intent was to glue the spline joint, but midway through construction, it became obvious that there are overwhelming advantages in converting from a glued spline joint to essentially a bolt-on, double mortise and tenon joint, as seen on many steel string instruments (Fig. 2). The advantages lie mainly in the ability to consistently place and hold parts during fitting. There is no reason, however, why a glued joint cannot be used with this method, but I have not detected any sonic or structural weaknesses in the bolting method.
Fig. 2. Unassembled body and neck.

Preparing the Soundboard
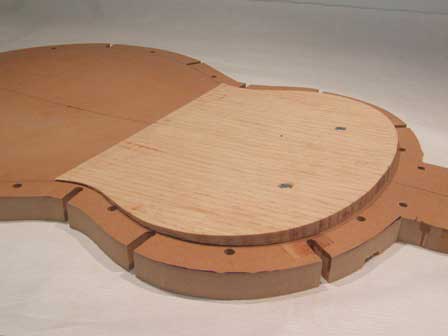
The soundboard is braced normally using a dished solera and go-bar deck, except that a ramp that matches the desired elevation profile (minus fingerboard) is attached to the upper bout of the solera (Fig. 3). With the ramp attachment, the soundboard will retain the shape of the fall-away once braced. The ramp attachment is made by gluing together many smaller ramps that are reproduced by template routing. In this case, the profile of the elevation is designed to have 3 mm of neck (not including fingerboard) protruding above the soundboard at the soundhole and 11 mm at the 12th fret (front of body). The fall-away of the soundboard from the plane of the lower bout begins gradually at the edge of the soundhole (bridge-side) and then extends in a straight line to the front-end of the body. There is no side-to-side doming in the upper bout.
Fig. 3. Solera with ramp attachment.
Mortised Head Block
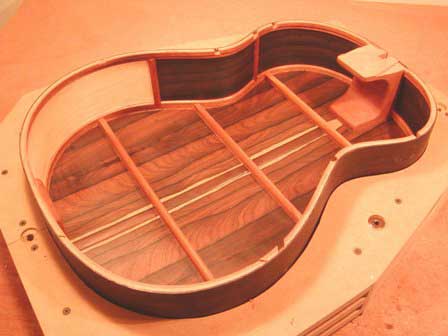
The head block is “U”-shaped, with a long, upper portion to support the neck extension (Fig. 4). Before being shaped, the block begins as a solid mahogany blank with a 10 mm wide mortise cut with a table saw and dado blade. The sides and head block are profiled to match that of the solera’s ramp attachment. Fig. 2 shows a front view of the mortise with the body fully assembled.
Fig. 4. View of head block and profiled sides before gluing the top.
Preparing the Neck Extension
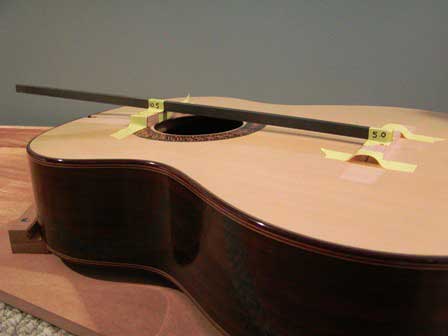
The most problematic step in constructing an elevated fingerboard is cutting the proper angle in the neck extension and establishing a good fit between the bottom of the extension and the soundboard. It is generally agreed that proper classical neck angle can be achieved when the plane defined by the top of the frets extends to approximately the middle of the front of the bridge (height-wise). For a standard classical bridge of 8 mm in height, this would be 4-5 mm above the soundboard. 5 mm is used here. Given that the fingerboard used in this case is 6.5 mm thick, the frets 1 mm tall, and the desired neck extension thickness above the soundboard (at the soundhole) is 3 mm, the top plane of the frets would sit 6.5 + 1 + 3 = 10.5 mm above the soundboard at the top of the soundhole. To model the desired neck angle, blocks with these heights are placed at the soundhole and bridge positions, and a straight edge (in this case a carbon fiber rod) is rested on the blocks (Fig. 5). In this case the distance from the top of the soundboard at the 12th fret to the bottom of the rod is measured to be 18.5 mm. This means that the height of the neck extension at the 12th will be 18.5 - 6.5 - 1 = 11 mm. The geometry of these dimensions gives an angle of about 4 degrees.
Fig. 5. Method to model the angle of the neck.
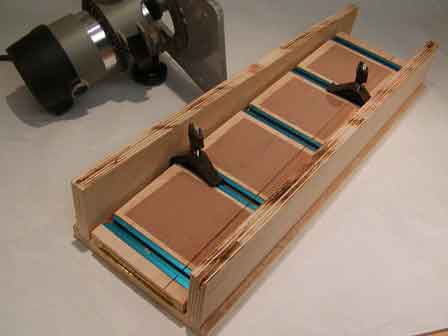
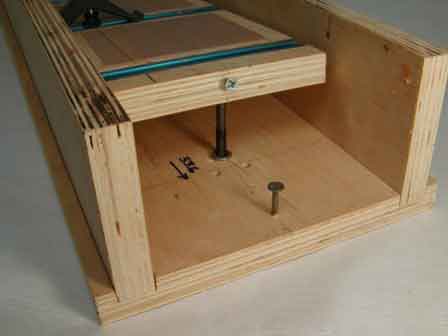
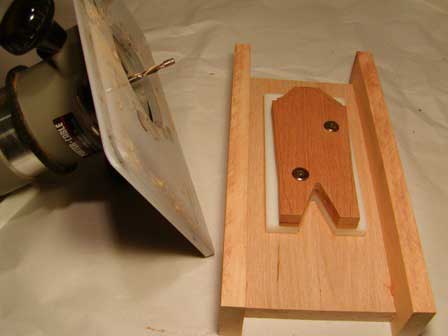
To create the angle in the neck extension, the neck is fixed to a jig with a sandpaper-covered (for grip), adjustable ramp, and then cut with a router riding on the fixed rails of the jig (Fig. 6). The jig’s ramp is attached with a hinge at one end (Fig. 7), and can be adjusted to any desired angle at the other end via a bolt that is screwed into a threaded insert (Fig. 8). The desired angle can be set by adjusting the height of the bolt according to the formula: height = length of ramp from hinge to bolt x tan(desired angle). Reality check: before cutting the real neck blank, cut a scrap piece of wood from a 2x4 that models the full height of the neck blank + fingerboard + frets. Test fit the model over the upper bout—the top plane should line up with the 5 mm block at the bridge position. If necessary, slightly adjust the ramp’s angle, repeat on the scrap model until the fit is perfect. There is a small amount of latitude here for moving the neck forward or backward to achieve the proper alignment.
Figs. 6-8. Cutting the angle in the neck with the adjustable-angle jig.

Final Fitting of the Neck Extension
There will be a small amount of arching in the upper bout, particularly near the soundhole where the fall-away begins. The underside of the neck extension can be fine-tuned with a scraper to exactly match the surface of the soundboard.
Fixing the Position of the Neck
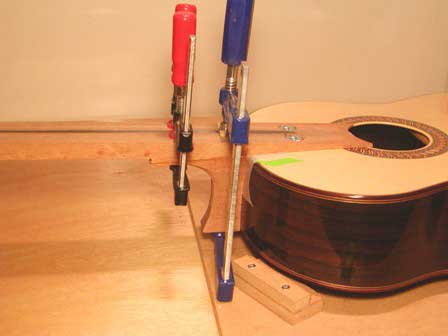
When the final fit is perfect, the neck is positioned and clamped to the body through the soundhole. To bolt the neck in place, two holes are drilled through the neck, soundboard, and head block extension to accept a pair of ?-20 x 1” (3/16” hex head) bolts stabilized by washers and lock washers (Fig. 2). The holes in the neck extension are widened and countersunk to accept threaded prong nuts that receive the bolts. The neck can now be bolted to the body by reaching through the soundhole (Fig. 9). With the neck in place, the top of the heel block (pre-cut with a 10 mm-wide mortise) is given the complementary angle of the neck extension angle using a belt sander. The test fit between the heel, neck, and body should be made with a spline in place to reference the body to the heel block. When the fit is perfect, the rough shape of the heel block is cut on a bandsaw (Fig. 10), the neck is removed from the body, and the majority of the heel block cheek material is removed by undercutting with a chisel. The final fit of the block’s cheeks is achieved by taping sandpaper to the body on both sides of the mortise, inserting a spline into the mortise to index the heel block, and running the block back and forth until fully seated.
Fig. 9. Neck bolted to body and heel block shaped with complementary angle. Note the carbon fiber rod inserted into the neck for added stiffness.
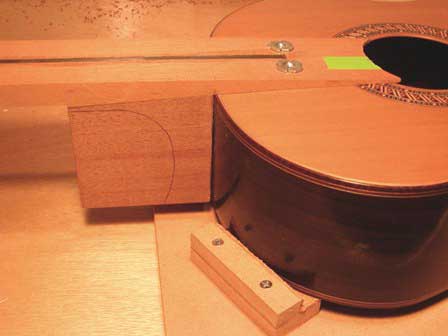
Fig. 10. Heel block blank with complementary angle (left) and rough-shaped heel (right).
Installing the Heel Bolt
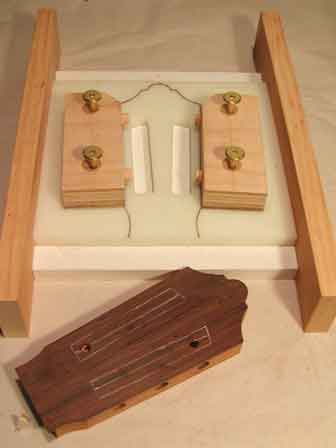
With the neck and heel properly fitted, maple inserts and splines are epoxied into position as shown in Fig. 2. The inserts fill the middle of both heel and head blocks where the bolt hardware will be placed, while splines are glued into the top and bottom of the heel block and will extend into the body’s mortise. A hole is next drilled through the head block insert and head block to accept a furniture bolt, and another hole is drilled through the heel block insert and partially through the heel itself to accept a threaded insert. Both the neck and heel can now be bolted to the body and tested for fit.
At this point, the neck and heel are not glued together. Instead, the head is prepared next and fitted to the neck shaft using a V-graft. The reason for this sequence is that prior to fixing the position of the neck to the body using the bolts, there is some uncertainty as to where exactly the head must attach to the neck. For this reason, a V-joint is chosen over a scarf joint because the V-graft can be placed very precisely and the entire head can be prepared independently of the neck and attached at a later time.
Preparing the Neck V-Graft Tenon
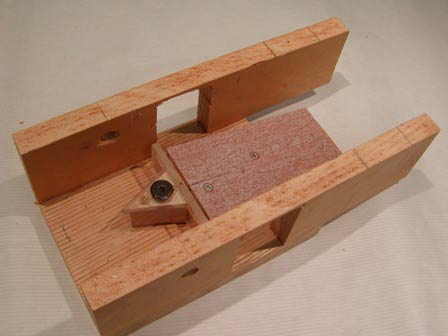
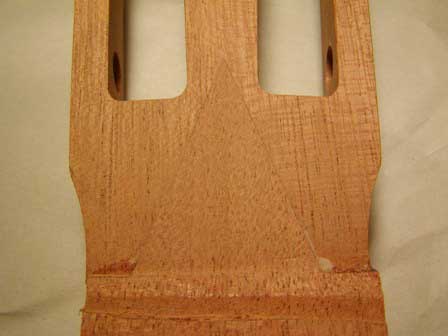
With the neck bolted into place, the position of the neck/head junction is marked and the tenon of the V-joint is first rough-cut on a band saw, placed on a jig with an 11 degree ramp fitted with a tenon-shaped template, and then cut with a router fitted with a 1/4” diameter spiral flush trim bit (Whiteside) (Fig. 11). The jig has tracks parallel to its base, an acrylic template for the tenon that is bolted to the base, and holes in the rails through which the neck can be clamped to the sandpaper-covered ramp (Fig. 12). After routing the tenon, the inside corners left round by the router bit are finished with a chisel. Note: For a 45 mm long tenon and 18 mm thick head joined at 11 degrees, the neck blank must start at least 28 mm thick. If the cutting length of the flush trim bit is not long enough to cut through the entire depth of the neck blank, the top and bottom of the tenon must be first reduced in thickness--the top reduced by routing in the jig with the tenon side at the top of the jig’s ramp, and the bottom reduced by routing in the jig with the neck turned around and the tenon placed at the bottom of the ramp.
Fig. 11. Routing the neck V-graft tenon in the ramped jig.
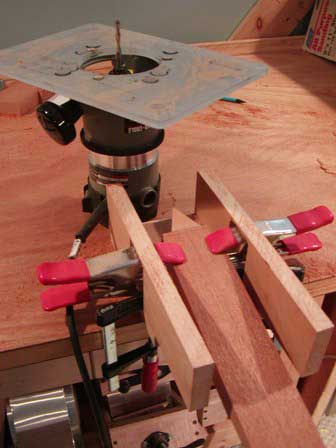
Fig. 12. Finished V-graft tenon.
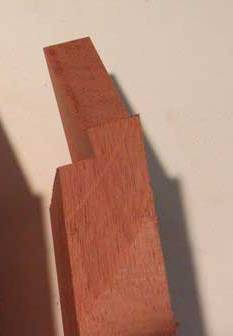
Fig. 13. Ramped jig for cutting neck tenon.
Preparing the Head V-Graft Mortise
The head material is reduced to approximately 18 mm thick, rough cut on a bandsaw, bolted horizontally on a jig with router rails, and then shaped with a flush trim bit that follows a complementary mortise template (Fig. 14). After routing the mortise, the inside corners left round by the router bit are finished with a chisel.
Fig. 14. Routing the head V-graft mortise.
Head Profile and Roller Slot Shaping
After the head plate is glued, the head profile is routed, roller holes are drilled, and then the roller slots are routed (Figs. 15 and 16).
Fig. 15. Template routing the head profile. The head is secured with bolts positioned in the eventual roller slots.
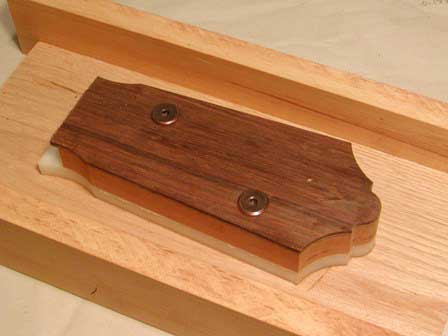
Fig. 16. Jig for template routing the roller slots. The head is secured through the roller holes.
Gluing the V-Graft.
The joint is glued with hot hide glue using horizontal and vertical pressure (Figs. 17-18).
Fig. 17. Gluing the V-graft.

Fig. 18. Completed V-graft.
Final Assembly of the Neck, Heel, and Body
With the head attached, the neck/heel assembly is dry-fitted to the body by firmly bolting the neck to the body, and bolting the heel to the body snuggly but not fully tightened. The heel is clamped to the neck and two ?” holes are drilled vertically through the two pieces to accept dowels. The parts are unbolted and the body’s surfaces are covered with waxed paper to protect it from glue. With glue applied, the process is repeated, dowels are inserted, and the assembly is clamped (Fig. 19). Gluing the assembly in situ assures that the neck will fit to the body perfectly when dry. After the neck is assembled, the fingerboard is installed, and the neck is shaped and finished.
Fig.19. Final neck assembly. Note dowels beneath the blue clamp.