Official Luthiers Forum! http://mowrystrings.luthiersforum.com/forum/ |
|
Headstock Repair Tool. http://mowrystrings.luthiersforum.com/forum/viewtopic.php?f=10102&t=13087 |
Page 1 of 1 |
Author: | David Collins [ Sat Aug 04, 2007 4:58 pm ] |
Post subject: | |
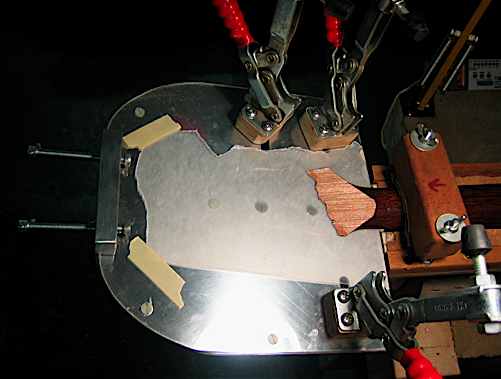
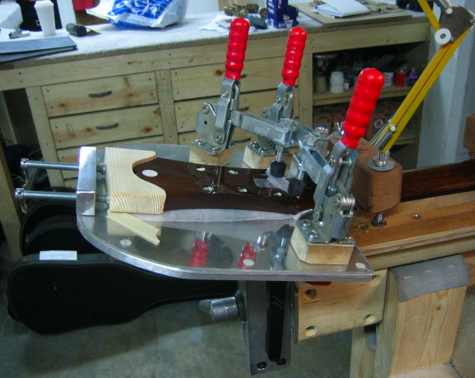
I know this forum is primarily builders, but this could be useful to some. just going through my photo folders and posting anything that may be of interest. I made this years ago to better reglue fully separated headstocks, and it has paid for itself ten times over. The goal was a better way to put pressure on the end to prevent slipping as you are clamping, while not levering the headstock one way or the other like a strap may do. I now use it on almost all headstock repairs automatically, and it saves loads of time. |
Author: | David Collins [ Sat Aug 04, 2007 5:11 pm ] |
Post subject: | |
Among my favorite features are the predictability and controlling of the clamping. When doing a dry clamping all of the pressures can be set, and will reliably repeat when glue is applied. The other perk is the speed of clamping for those who use hide glue - 15 seconds from applying glue to being clamped would be very a casual pace . It takes a few moments to make a caul for the end of a headstock, and setup time is minimal. I'd still like to make an attachment to guide a laminate trimmer for splines and perhaps backstraps. For now the whole thing will clamp on to my milling table though, so I haven't been in a rush. |
Author: | Peter J [ Sat Aug 04, 2007 11:44 pm ] |
Post subject: | |
Nicely done David. It looks as though the aluminum plate can be drilled for a number of clamp locations and arrangements; very versatile. In the mfg. eng. world we would call it "flexible tooling." The clamp that exerts downward pressure on the headstock is great and could be accomplished with one or two striaght line action clamps and possibly even save you the effort of having to make a specific caul each time. Thanks for the photos. Cheers, Peter |
Author: | Dave-SKG [ Sun Aug 05, 2007 12:20 am ] |
Post subject: | |
O.k....how much? |
Author: | Frank Ford [ Sun Aug 05, 2007 1:30 am ] |
Post subject: | |
Terrific! Looks like I'll busy soon. .. Cheers, Frank Ford FRETS.COM Gryphon Stringed Instruments My Home Shop Pages |
Author: | jhowell [ Sun Aug 05, 2007 2:11 am ] |
Post subject: | |
David-- Thank you for posting this. It looks like just the ticket for clamping up V-joint headstocks. I've come to the conclusion that with honduran mahogany stocks headed the way they appear to be headed that the V-joint is becoming a viable alternative to one piece necks, especially for 12 fret slotheads. |
Author: | Evan Gluck [ Sun Aug 05, 2007 2:19 am ] |
Post subject: | |
Awesome! Frank make 2! Thanks for sharing David. Evan |
Author: | crazymanmichael [ Sun Aug 05, 2007 2:37 am ] |
Post subject: | |
this is certainly a lot more sophisticated bit of design than the rather crude version i've been using. this jig is simple, yet highly adaptive. once again you've given me something i want to replicate. |
Author: | David Collins [ Sun Aug 05, 2007 2:53 am ] |
Post subject: | |
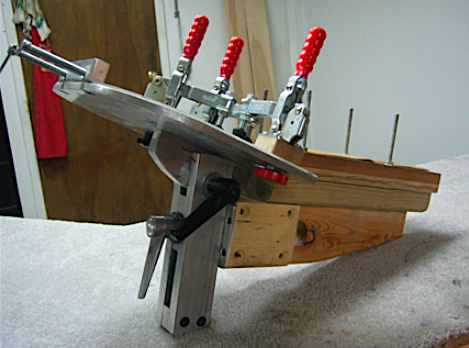
Thanks guys. Dave, I've thought of getting in to the luthier's tool making business, but it's just not my trade. Part of the reason I post things here is in hope of others making them for sale, because quite honestly I only make my own tools when there's nothing available to do what I need. If someone like Watkins, StewMac, LMI, etc., were to make things like this I would probably buy them before making my own. Peter, I originally wanted to use some straight DeStaCo clamps for the end, but made the tool over a weekend with just what I had laying around the shop. Once I got used to the screw clamps I never got around to retrofitting it with inline toggle clamps. Unlike the main clamps with the rubber tips however, think I would like to use hard clamping faces. It seems clamping in this axis is more position-dependent than pressure- dependent for accuracy. With hard faces I would still have to make end cauls, but tracing on a chunk of 3/4" pine, band saw and spindle sander takes perhaps 3 minutes. By now I have a good drawer full of various headstock shapes on hand anyway. If I were making a new one I may use the straight line action clamps you recommended, but for now if it ain't broke I've got plenty of other projects to keep me busy . Now I just mark the position of the handle with a piece of tape, then loosen one full turn from the dry clamping. I should also note I made this before I had any milling machine, and it's all band saw, drill press, router and files, so it's a very doable home shop project. A few things I didn't realize may not be obviously apparent from the photos; The toggle clamps are mounted through slots in the plate, about 1 1/2"-2" long for adjusting position. There is a 1/8" clear plexi plate over the the aluminum base plate. I screwed it down with nylon screws to be careful to avoid anything that could scratch, although if the heads are properly countersunk this could be redundant. The cradle that the neck sits in is a piece of corian (why, I don't recall) with two strips of 3/16" stiff rubber as rails toward the edges. It also has a layer of cork over these, although it really doesn't need it. The important part is that it slides toward or away from the headstock. The reason is that changing the angle of the plate for different headstocks will change the position, and I wanted to be able to keep the underside supported as well as possible. This need could probably be eliminated by putting the axis on the plate closer to the nut. The next important update to the tool will be some more adjustable clamps. Occasionally I will find a cracked headstock that needs a bit of pressure from the sides at the heel. For this I will probably make some clamps that just attatch on to the edge of the plate rather than mounting holes - the needed position varies too much to justify a dedicated location. It will probably be a screw clamp (out of size/space considerations) mounted to an arm with a ball joint base. I'll probably just tear apart a few ball joint swivel vises for this out of convenience. |
Author: | KenH [ Sun Aug 05, 2007 3:40 am ] |
Post subject: | |
Outstanding tool David!
Also, it os good to see you posting on the forum Frank ford! Please feel welcome and at home here! |
Author: | JohnAbercrombie [ Sun Aug 05, 2007 3:58 am ] |
Post subject: | |
Thanks, David. I've got a couple of eBay guitars with snapped headstocks that have been waiting for this very idea! Cheers John |
Author: | Bob Garrish [ Sun Aug 05, 2007 4:51 am ] |
Post subject: | |
That's a beautiful tool, I'll put it on the stack of things to program for the Fadal when I get some time later this year. |
Author: | Cocephus [ Sun Aug 05, 2007 5:57 am ] |
Post subject: | |
Ingenious, David! What do you call it, a "Headstock Halo"? |
Author: | Billy T [ Sun Aug 05, 2007 6:07 am ] |
Post subject: | |
Looks to save a lot of headaches! Good carry thru! |
Author: | curtis [ Sun Aug 05, 2007 8:48 pm ] |
Post subject: | |
excellent idea! thanks for showing us that, i'll be making my own asap. |
Page 1 of 1 | All times are UTC - 5 hours |
Powered by phpBB® Forum Software © phpBB Group http://www.phpbb.com/ |