Official Luthiers Forum! http://mowrystrings.luthiersforum.com/forum/ |
|
Specs on a style 45 rosette http://mowrystrings.luthiersforum.com/forum/viewtopic.php?f=10101&t=54624 |
Page 1 of 2 |
Author: | jfmckenna [ Wed Dec 15, 2021 3:17 pm ] |
Post subject: | Specs on a style 45 rosette |
Does anyone have any details on the way Martin did this in the 30's. I know of this wonderful site and can at least make out the purfling strips and so on but I don't know the actual widths, diameter, and so on, and to some extent materials would even be nice to know. I'm trying to get as authentic as possible on this upcoming OM-45. http://vintagemartin.com/style45.html |
Author: | bluescreek [ Thu Dec 16, 2021 8:06 am ] |
Post subject: | Re: Specs on a style 45 rosette |
they did them a few ways the older ones were wood fiber or wood and fiberloid for the white at the pearl measurements in inch not sure the date they went to plastic on the 45s but it was later than when the changed the 28 style there are 45 examples of wood rosettes up to WW2 inner rosette is 15b12m20b12m15b space .115 15b12m20b40ivroid15b.65 green abalone 15b40ivroid20b12m15b The M is for maple or pear space.125 repeat first ring then when they went to plastic it was similar a slightly bigger |
Author: | jfmckenna [ Thu Dec 16, 2021 8:45 am ] |
Post subject: | Re: Specs on a style 45 rosette |
Awesome! Thank you very much John. |
Author: | Woodie G [ Thu Dec 16, 2021 9:27 am ] |
Post subject: | Re: Specs on a style 45 rosette |
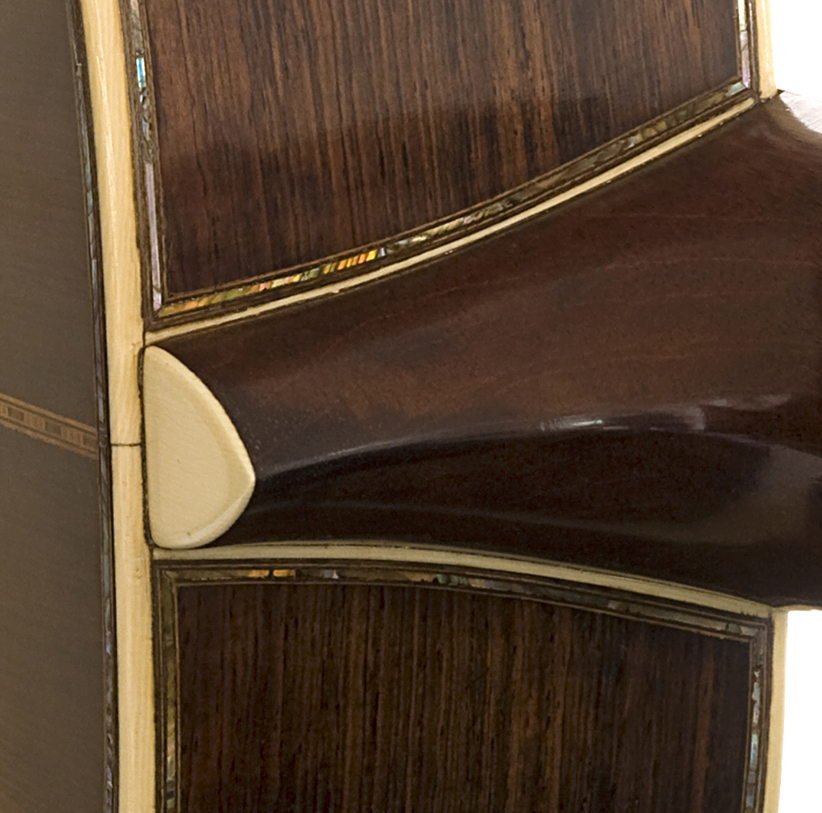
There is some variation in inner and outer ring stack. While 1920-1930 Style 42 and 45 series show a distinct double-width middle black in the BWBWB, as you move closer to the mid-to late 1930's period, that middle ply has less/no variation from the BW and WB plies around it. If replicating a certain guitar, try to find a good rosette shot for that year's guitars to see whether the center ply is that double width. Also, on the 45 series rosettes we measured, the differences between the inner to middle and middle to outer ring gaps were closer to .020" across 00, 000 and D, with the inner gap at about 0.095" and the outer at about 0.015". Too little difference looks as odd as too much, and the overwhelming number of other builder's faux-45 guitars use equal spacing and look quite odd because of it. All that aside, I prefer the equal/closer to equal-spaced plies on the later (early 1930's-1942?), but the guys preferred the look of the wider center lam. On their Series 42 guitars, they did CAD renderings to decide on the best spacing re: inner and outer rings...and varied that a bit between 000 and D. A final consideration is the width of the shell box around the extension, with quite a bit of variance in the amount of black border seen on prototype guitars. Inconsistent width or overlap of the BWB borders a bigger issue than extra width, and we saw enough variation in that width such that a little extra width should not be an issue. With that in mind, that trim around the board generated a change in build order versus the usual Greenridge OOB, with the body being closed, trimmed, and block sanded, neck joint cut on body and neck, the neck completed and set (as in dry-fitted to desired angle, etc.), then the body bound. This allowed the boxing around the extension to be efficiently laid out and milled based on actual dimensions versus desired/should be. Edited: A question: I've been told that the shell used on the original 40 series guitars was green abalone, with paua used only after the 45 was returned to production. On those earlier guitars, it is hard to judge from photos whether the shell is the more colorful paua, muted by ambering/increased opacity of lacquer, or the greyer/cooler blue/green green abalone. An opinion: Solid shell looks so, so much more authentic than solid shell substitutes. We've seen some replica 42 and 45 series guitars ruined by the busier appearance of substitutes. |
Author: | bluescreek [ Thu Dec 16, 2021 10:25 am ] |
Post subject: | Re: Specs on a style 45 rosette |
in the older 45s the pearl was green abalone and they used the flashier on the top back and sides were much plainer. The top was about .0625 to .065 as it was hand cut and solid the back and sides were more delicate and about .050 wide and much plainer as compared to the top. |
Author: | jfmckenna [ Thu Dec 16, 2021 3:13 pm ] |
Post subject: | Re: Specs on a style 45 rosette |
Thanks Woodie, and thanks again John. Yeah I have not gotten there yet but will be asking questions about the bindings and in particular how to do it around the fretboard and along the heel. I have mentally worked out some ideas but this is new to me, the part along the heel and the side edge binding in particular. |
Author: | bluescreek [ Thu Dec 16, 2021 4:14 pm ] |
Post subject: | Re: Specs on a style 45 rosette |
the 45 is a very pretty scheme to do this you must first set the neck , and be aware of how well you center your fretboard to the rosette. The next thing is to finalize all the miters. I set the fretboard extension and I glue up the purfling and pearl into a stick so I only have to work on thing , and I can really get the corner miters tight. I set the rosette one first , then along the side. You have to pay close attention to the pearl and purfling , as they will miter on the top , then the binding frames that . The neck has to come up and miter under those so it takes some finesse and take your time. I found a very sharp chisel works great for mitering. Also a sanding block with 320 grit can to well if you are not comfortable with the chisel. On the tail piece , you have to set that and glue in so the space matches your purfling. Note that the side and back is different than the top.. so here is the layout top from the side in binding B/W/B pearl B/W/B be sure to match the black to the pearl the same on the top , back and sides, Sides Binding B/W/B pearl ( .049 ) B/W Back Binding B/W/B pearl (.049 ) B/W Tail B/W/W Pearl B/W the B/W/B will often have a heavy and a thin black. The B/W will match one of the blacks , so that is the black that goes against the pearl. Try and get your purfling from the same supplier so you will have better matching material. I personally glue in the tail piece and use poly to hold my space for Tail getting that to box out perfect can be tricky so take your time and plan to redo it . I use my binding machine but sometimes I may need to use my inlay or dremel to perfect the fit. You want the framing around the tail to be seamless into the side binding and purfling. Once I have all the purfling miters set I start to glue it on. The poly strips holds the spacing for the later inlay. It is extremely difficult to try to inlay the pearl at the same time you bind and I do not use CA as that will often glue in the poly. I have been using duco cement. This releases the poly well , then I can set my miters in the pearl and drop in. If you need to shim the pearl up I found that cotton thread makes a great shim under the pearl . One hint that I found helpful to get the clean lines I wanted was to set the purfling on the top just a touch proud to sand flat Pearl is about .050 thick purfling is about .060 so sand to the pearl. On the sides the same thing , that is why you use the cotton thread to shim pearl up if you need to. |
Author: | jfmckenna [ Thu Dec 16, 2021 6:55 pm ] |
Post subject: | Re: Specs on a style 45 rosette |
Good stuff! Thank you. |
Author: | Woodie G [ Fri Dec 17, 2021 7:46 am ] |
Post subject: | Re: Specs on a style 45 rosette |
While technique for the Style 45 side and back shell is an extension of the usual techniques for milling, spacers and then snap-and-glue, getting an accurate job done on the extension was more of a challenge. As I mentioned earlier in the thread, getting the neck and fretboard fitted makes things easier, and allows use of a few simple spacers and jigs for the job. Here's the link to an earlier thread on the approach used at Greenridge, and I'll suggest you do a search here and elsewhere for other techniques. viewtopic.php?f=10101&t=52568&p=690943&hilit=shell+Style+42#p690943 If for no other reason than to understand that soundhole position may impact 20th fret real estate and where the extension trim corners land on the rosette, it seems to me that review of any and all posts on trimming the extension is time well spent. As touched on in the linked thread, when the Martin Custom Shop people mention that they have occasional issues with getting it right, best to invest some time in understanding the relationships between the bits and pieces. Best of luck with the work. |
Author: | jfmckenna [ Tue Dec 21, 2021 9:24 am ] |
Post subject: | Re: Specs on a style 45 rosette |
I was looking over at the Martin 1833 Shop and see that they sell, but are out of stock, the actual schemes for the rosettes and purfling minus the abalone. This would be Sooo perfect and make my life easy. Do you know of anyone else who might have sets like this... Maybe you do John? https://www.martinguitar.com/gear-acces ... music-gear https://www.martinguitar.com/gear-acces ... arts-other I'm having difficulty finding the appropriate thickness veneers from my regular suppliers. I may have to settle for slightly off and that's okay too but it would be real nice to jsut purchase the kit. |
Author: | bluescreek [ Tue Dec 21, 2021 4:49 pm ] |
Post subject: | Re: Specs on a style 45 rosette |
Actually you can now call and order or email PM me I will get you the contact info this is for the modern D 45 not the vintage.. I do have vintage rosettes Happy Holiday and Merry Christmas |
Author: | jfmckenna [ Tue Dec 21, 2021 4:58 pm ] |
Post subject: | Re: Specs on a style 45 rosette |
Great! I'm going to let the holidays settle down and over with and will definitely get with you. Vintage is what I am after too. |
Author: | jfmckenna [ Mon Mar 21, 2022 9:03 am ] |
Post subject: | Re: Specs on a style 45 rosette |
Another question on the 45 build... Do you reinforce the area under the top and fret board where the abalone inlay runs along and around the fretboard extension ? It seems to me that this area is under a lot of stress and that routing out a channel right along the fretboard like that would weaken the top there considerable. This area is where you see lots of cracks and even folding deformation. So I was wondering if maybe gluing a spruce strip there would help it out? |
Author: | bluescreek [ Mon Mar 21, 2022 10:12 am ] |
Post subject: | Re: Specs on a style 45 rosette |
the popsicle brace should be fine |
Author: | jfmckenna [ Wed Oct 05, 2022 9:10 am ] |
Post subject: | Re: Specs on a style 45 rosette |
Ok getting ready to bind these 45's I'm working on and I have not determined quite how I will do the FB extension but will probably follow Woodie's method as linked to above. But what I have not any good ideas on how to accomplish is the purfs that run along the heel of the neck from the top to the back on the guitar sides. I've not Googled around on that but thought I would open up this thread and see if anyone has ideas or even better a tutorial like Woodie's. I was thinking a bit on it... Maybe create a little cutter made out of wood with an Exacto blade, a gramil if you will, and just do it by hand? |
Author: | bluescreek [ Wed Oct 05, 2022 10:18 am ] |
Post subject: | Re: Specs on a style 45 rosette |
As mentioned above in a thread A get the neck set finish sand the neck so you have the shape of the heel Now measure what exposure you want. I allow about 1/8 in of the binding color and let the rest set under the heel now make a spacer and use a SHARP exacto blade to score the line . I use my inlay tool to open the channel Take your time. You want all those miters to flow together. feel free to call me if you need advice. |
Author: | jfmckenna [ Wed Oct 05, 2022 2:25 pm ] |
Post subject: | Re: Specs on a style 45 rosette |
Thanks John. |
Author: | John Arnold [ Wed Oct 05, 2022 8:50 pm ] |
Post subject: | Re: Specs on a style 45 rosette |
I used a Dremel with the router base. The curved guide was made of wood, clamped on with a bar clamp across the top and back. Sent from my SM-G950U1 using Tapatalk |
Author: | jfmckenna [ Mon Oct 24, 2022 8:11 am ] |
Post subject: | Re: Specs on a style 45 rosette |
And now one more question... What side dot material did Martin use on the old 45's? Well two more questions... What diameter are the dots?? |
Author: | bluescreek [ Tue Oct 25, 2022 3:15 pm ] |
Post subject: | Re: Specs on a style 45 rosette |
1/16 of an inch |
Author: | jfmckenna [ Wed Oct 26, 2022 8:22 am ] |
Post subject: | Re: Specs on a style 45 rosette |
bluescreek wrote: 1/16 of an inch Thanks John, and do you know what material they used? |
Author: | bluescreek [ Wed Oct 26, 2022 6:22 pm ] |
Post subject: | Re: Specs on a style 45 rosette |
yes a celuloid plastic called fiberloid no longer available. |
Author: | jfmckenna [ Wed Oct 26, 2022 8:04 pm ] |
Post subject: | Re: Specs on a style 45 rosette |
Ok thanks again John. Looks like Stewmac sells black plastic rods in 1/16th so there it is. Regards. |
Author: | bluescreek [ Thu Oct 27, 2022 9:14 am ] |
Post subject: | Re: Specs on a style 45 rosette |
look at Michaels you can find color artist leads cheap and they do a great job |
Author: | jfmckenna [ Thu Oct 27, 2022 10:05 am ] |
Post subject: | Re: Specs on a style 45 rosette |
Oh ok great. Got one right down the street from me. |
Page 1 of 2 | All times are UTC - 5 hours |
Powered by phpBB® Forum Software © phpBB Group http://www.phpbb.com/ |