Official Luthiers Forum! http://mowrystrings.luthiersforum.com/forum/ |
|
Martin 45 style purfling http://mowrystrings.luthiersforum.com/forum/viewtopic.php?f=10101&t=40642 |
Page 1 of 1 |
Author: | roby [ Fri Jun 14, 2013 6:01 am ] |
Post subject: | Martin 45 style purfling |
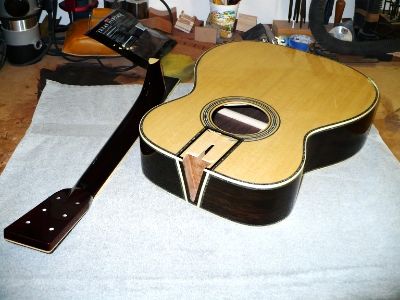
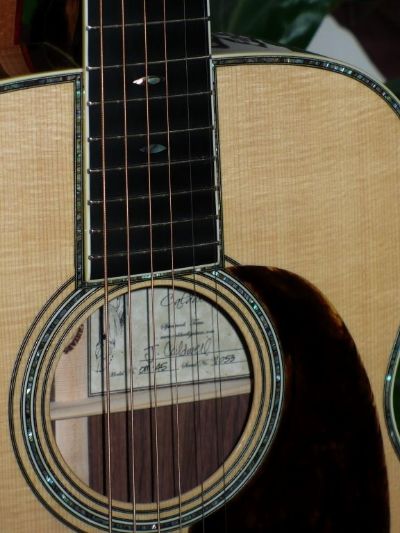
Anyone done 45 style purfling around the fingerboard extension,i would be interested to see how this is done.Thanks Roby |
Author: | RaymundH [ Fri Jun 14, 2013 9:10 am ] |
Post subject: | Re: Martin 45 style purfling |
I like this site for idea's; http://www.vintagemartin.com/style45.html |
Author: | Tony_in_NYC [ Fri Jun 14, 2013 9:14 am ] |
Post subject: | Re: Martin 45 style purfling |
You could use a guided, pattern cutting router bit and make a tongue to clamp down in place of the FB extension, then route around the tongue as your guide. If you use a .25 inch bit with a half inch bearing, just make the tongue an inch narrower than the FB extension and a half inch shorter. You will need to square up the outside corners, but that's easy enough. That is how I would do it. I would guess you could also use a flush cutting bit. I have always wondered how this was done as well. I recall seeing a thread on this somewhere, but I forget if it was even on this forum. |
Author: | WilliamS [ Fri Jun 14, 2013 12:15 pm ] |
Post subject: | Re: Martin 45 style purfling |
Call me crazy but that looks like it would be relatively easy to do by hand (I would like to mention, though that I never have done this). If it were me I'd probably dry fit the neck and score around the extension. then I'd either layout the purf lines and use a straight edge and knife or, more likely, I'd make up a quick little jig similar to the popsicle stick rosette cutter only I'd use a stick with a flat end and tap the exacto blade the width of the purfling from the end of the stick and butt the end up against the extension, using it as a guide. You'd want to be sure to take very light passes,tapping the blade a little further through the stick each time. Then chisel out the waste. Probably take 10-15 min. |
Author: | theguitarwhisperer [ Fri Jun 14, 2013 1:13 pm ] |
Post subject: | Re: Martin 45 style purfling |
I believe this guy details the purfling style you are looking for. http://www.amazon.com/Step---Step-Guita ... r+building |
Author: | Joe Beaver [ Sat Jun 15, 2013 12:57 pm ] |
Post subject: | Re: Martin 45 style purfling |
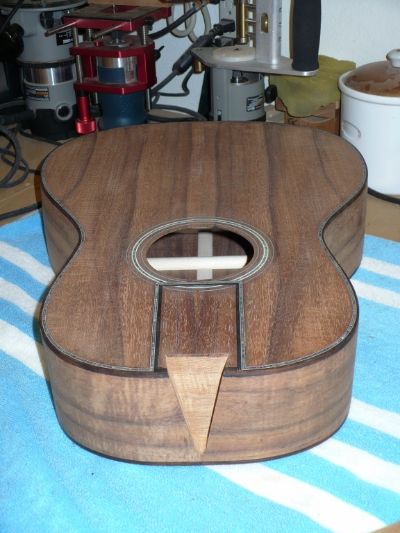
I've done a couple. I just put the neck on, marked the neck outline with masking tape, removed the neck, clamp a guide board down and route with a dremel and stew Mac base. Then just clean the corners up with a chisel and glue in the purfling. It's pretty easy. This is the first one I did. I took the binding around the fingerboard extension also. Thought it would look good but I think I like the Martin style better. |
Author: | Jimmy Caldwell [ Sat Jun 15, 2013 5:50 pm ] |
Post subject: | Re: Martin 45 style purfling |
I do mine pretty much like Joe and don't have any special jig or tooling for it. Make the neck first and be sure you have it to final dimensions, then use it as a guide for marking out the purfling. I do it after assembly with the binding, but I've seen it done along with the rosette prior to putting on the top. Either way works. I use the StewMac router base with some guides clamped to the body and it's not too tough. The 42 style trim isn't too bad, but if you want some real fun, do a 45 style. Lots of head scratching on those. |
Author: | Dave Stewart [ Sun Jun 16, 2013 11:13 am ] |
Post subject: | Re: Martin 45 style purfling |
Some shots of Olson's version here ........ really clean & tidy! http://www.acousticguitarforum.com/foru ... ost3511267 |
Author: | Joe Beaver [ Sun Jun 16, 2013 12:07 pm ] |
Post subject: | Re: Martin 45 style purfling |
Jimmy, that 45 style looks great. I'm not quite ready to tackle that. |
Author: | David LaPlante [ Sun Jun 16, 2013 8:06 pm ] |
Post subject: | Re: Martin 45 style purfling |
Fit the neck and mark the position of the fret board extension. I use an X-acto knife and a steel straight edge taped to the top as a guide. A small chisel is used to remove the wood down to about 2/3 the top thickness. On a 45 style you also have to carve the heel to establish the contour of the side fillets. For the end slug, a "dummy" wood one is used to fit the top binding and purflings against. It's then popped out and the ivoroid w/purflings and filler strips are added. Attachment: Laplante000-45.jpg Attachment: Laplante000-45IV.jpg
|
Page 1 of 1 | All times are UTC - 5 hours |
Powered by phpBB® Forum Software © phpBB Group http://www.phpbb.com/ |