Official Luthiers Forum!
http://mowrystrings.luthiersforum.com/forum/

Silkscreening your headstock logo.
http://mowrystrings.luthiersforum.com/forum/viewtopic.php?f=10101&t=39438
Page 1 of 2

Author:  Rob Flindall [ Wed Feb 20, 2013 9:33 pm ]
Post subject:  Silkscreening your headstock logo.

I did a lot of research on how I was going to do my headstock logo on my first two scratch build guitars. I would have loved to have done an inlay, but I'm quite nervous about doing inlays so I shied away from that. I was also thinking about having a decal made, but wasn't sure if the edge of the decal would show under the lacquer. And then the idea hit me - silkscreen the logo on. And silly me, I had a silkscreening machine down in my basement from another endeavour of mine.

So today I finally got my two necks to the point where I could finally tackle trying to silkscreen on my logo.

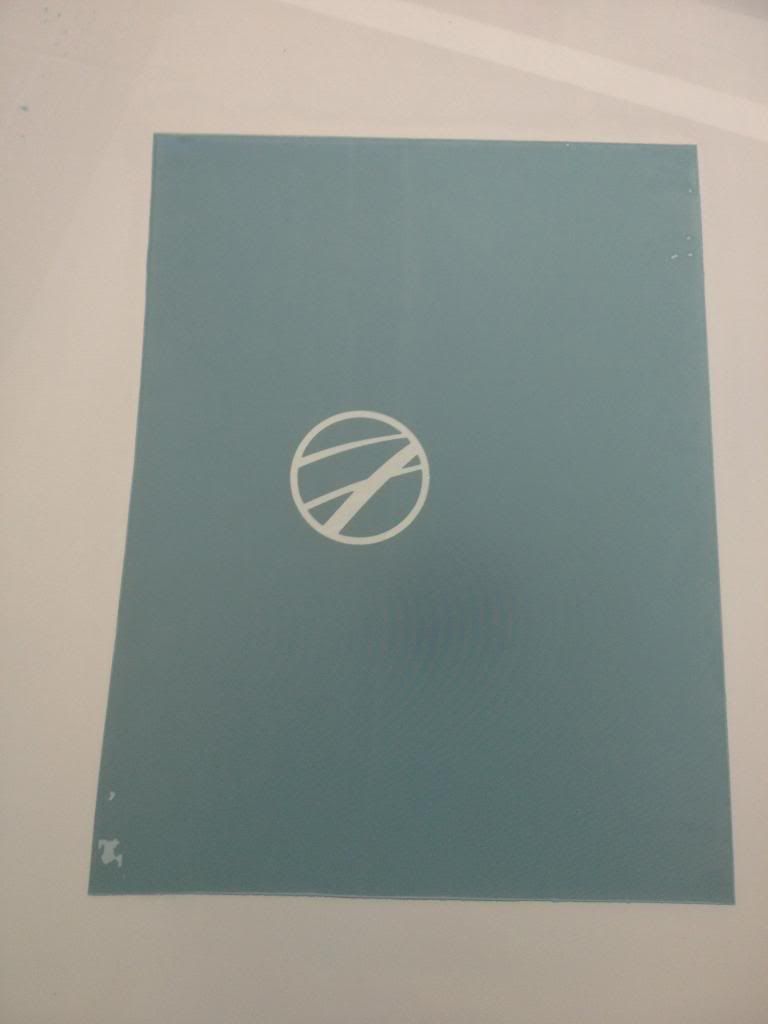
First I created the screen itself. I resized my logo to the correct size and created the logo in the screen.

Image

After I made the screen, I made a custom jig for the screen to fit into that holds the headstock in alignment, and prevents it from moving.

Image

Here's the screen in the jig. What's nice about doing it this way, is that the jig allows you to slide the logo up and down the centre-line of the headstock until you get it in the perfect position. Once I found the perfect spot, I used a piece of tape on the screen so I can line it up in the same spot every time.

Image

Next I put the neck in the jig and silkscreened the logo in a gold colour. What's nice about silkscreening is that you can make it any colour you want :)
Here's my test piece before I trusted myself to do it on my two necks.

Image

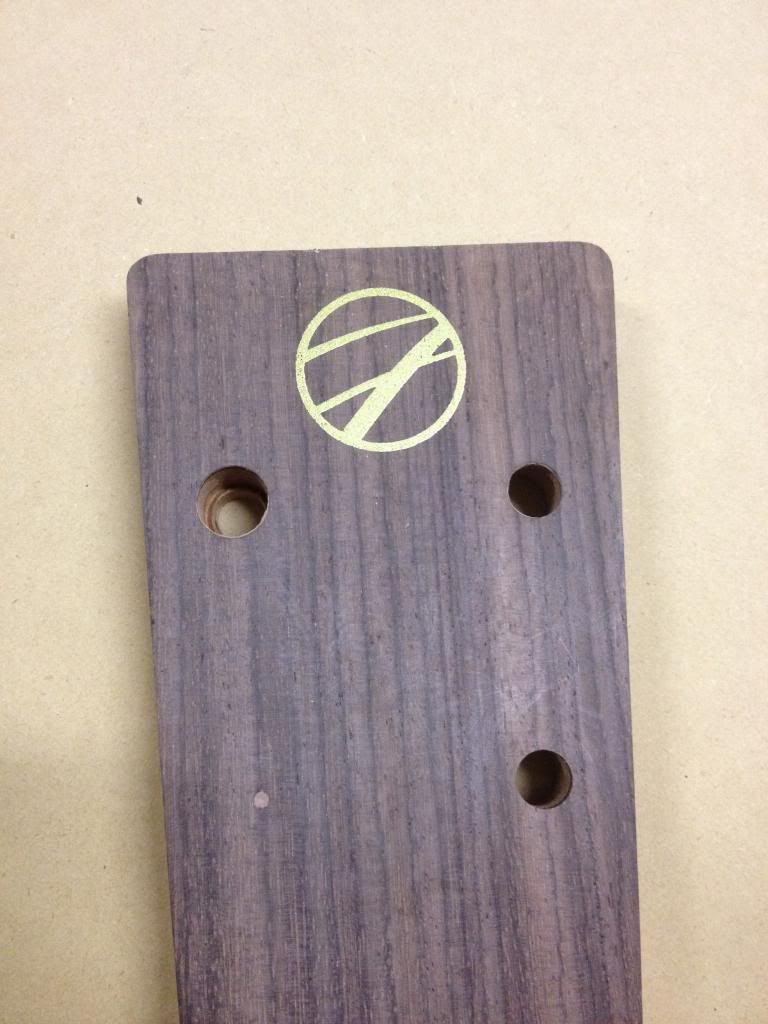
I was really happy with the results so decided to dive right in and put the logo on my necks. Here's how they turned out.

Image

Anyways, I know there's been discussion before on how to do your headstock logo, so I thought I'd share how my foray into silkscreening my logo turned out. What's also nice about silkscreening is that you can do some pretty intricate work with it.
Hopefully this gives someone else the inspiration to try silkscreening on your guitar.

Now I can't wait to get the lacquer on these baby's and see that logo really pop!

Cheers,
Rob

Author:  Tai Fu [ Thu Feb 21, 2013 12:21 am ]
Post subject:  Re: Silkscreening your headstock logo.

Filippo Morelli wrote:
Nice.

Water slide decal would be another option.

Filippo


That would require expensive printers that are no longer made (the ALPS printer) to do... I don't know who else would do waterslide decals but I imagine it would require a rather large run. Inkjet printers are not acceptable... Silkscreening is simple to do, it was my first project in my shop class.

Author:  JasonMoe [ Thu Feb 21, 2013 2:23 am ]
Post subject:  Re: Silkscreening your headstock logo.

Great idea Jag. I used to be a screen printer 20 years ago. I didn't even think of doing this. I hand paint my logo on by hand. I have thought about new options like a water slider like Filippo mentioned. I havn't found anyone local that does that so I just paint it by hand. I think they do have kits at Hobby Lobby. I worked for a large corporation and we made automotive dash displays for Chevy, VDO, Chrysler, Ford, Mercedes, and some washing machine parts from whirlpool. I did the ink testing and ran the printing for the C5 Corvette display. It uses a front lit black light display. I developed the inks and printed them in Spring Grove MN. Northern Engraving. Now the company is barely alive. All the jobs went to China. Corvettes are still the ONLY car 100% made in America. Heres a pic of what we made. We did make some with real gold racing flags. I wonder where they ended up. They told me the ink was 2,000.00 a pint. We only had 1 pint to work with.

Author:  Colin North [ Thu Feb 21, 2013 3:02 am ]
Post subject:  Re: Silkscreening your headstock logo.

Tai Fu wrote:
Filippo Morelli wrote:
Nice.

Water slide decal would be another option.

Filippo


That would require expensive printers that are no longer made (the ALPS printer) to do... I don't know who else would do waterslide decals but I imagine it would require a rather large run. Inkjet printers are not acceptable... Silkscreening is simple to do, it was my first project in my shop class.

Ebay, $40 a sheet

Author:  Don Williams [ Thu Feb 21, 2013 6:16 am ]
Post subject:  Re: Silkscreening your headstock logo.

That looks terrific. You're just going to have to seal it carefully and not sand through.

Testors sells a small inexpensive kit for decals that you use with an inkjet printer. I did this on my first ukulele, and it came out great! Very cheap materials, and you can do almost any color except metallics, I think.

Author:  Tai Fu [ Thu Feb 21, 2013 10:05 am ]
Post subject:  Re: Silkscreening your headstock logo.

Filippo Morelli wrote:
Tai Fu wrote:
Filippo Morelli wrote:
Nice.

Water slide decal would be another option.

Filippo


That would require expensive printers that are no longer made...

Not true at all. Decal paper for either an inkjet or laser jet printer. If you don't own either I sure you there thousand of them within a one square-mile walking distance.

Filippo


Won't work if you want metallics... only ALPS printers can do that. It's doable with silk screening though. I might think about silk screening if customers don't desire an inlaid logo.

Author:  LarryH [ Thu Feb 21, 2013 1:00 pm ]
Post subject:  Re: Silkscreening your headstock logo.

That's pretty slick Rob. I wonder how it would turn out if you sealed/pore filled the head stock first?

Author:  Greg B [ Thu Feb 21, 2013 2:27 pm ]
Post subject:  Re: Silkscreening your headstock logo.

Yeah, I agree, seal and fill first. The grain poking through detracts, IMHO.

The "partscaster hordes" sometimes have pretty cheesy looking decals, but many are impressive. Laser decals look good if you use a metallic pen for the gold/silver. There's a couple ways to do this. Neither of them work for a gold outline decal that would look good on a dark headstock. Some very expensive printers can do metallic ink, but it doesn't look quite right, IMO.

As far as I'm concerned, if you have the skills and gear to silkscreen, you may as well do it that way. After all, it is the correct - or at least original - way to make decals.

Author:  Patrick R [ Thu Feb 21, 2013 3:28 pm ]
Post subject:  Silkscreening your headstock logo.

I would be leery of any inkjet process due to a lack of light fastness. Screen inks are going to be much better because they are pigmented and most are made for exterior durability. This could also be done on top of the finish with a slow dry enamel.

Author:  Rob Flindall [ Thu Feb 21, 2013 6:42 pm ]
Post subject:  Re: Silkscreening your headstock logo.

The first headstock picture is just a scrap headstock I snagged from Martin when I was there last. It's not pore filled as you mentioned. I was more concerned about how the silkscreening would go on wood, so this was my test run. The wenge and bubinga headstocks however are pore filled. I use Zpoxy and the silkscreening stuck to it like glue. I put the logo on first, right after the zpoxy because I wanted it buried as deep as possible under the sealer and lacquer so I didn't sand through to it.

Rob

Author:  dradlin [ Fri Feb 22, 2013 7:33 am ]
Post subject:  Silkscreening your headstock logo.

This is timely - I was researching silk screening earlier this week for this same purpose.

How fine of line do you figure it could produce while being uniform and crisp?

I also looked into gold leaf... having a vinyl mask computer cut for the adhesive but at the $50 quoted for just the mask it is not practical.

I've been considering pad printing too but a small setup can't seem to be had for cheap.

Author:  Rob Flindall [ Fri Feb 22, 2013 9:29 pm ]
Post subject:  Re: Silkscreening your headstock logo.

You can actually get quite a fine line using silkscreening. I used a 220 mesh screen vs a coarser screen at 110.

The jar of gold colour ink I purchased is going to last me a lifetime too. My logo on the headstock is only an inch in diameter and consists of only fine lines so you can imagine how little of ink it actually used. Last night and tonight I've put two coats of vinyl sealer and a coat of nitro lacquer on so far with no issues. The nice thing too about the silkscreen is that the thickness of the print is so fine as to almost be unnoticeable. After just those 3 coats, you can't even feel the logo when you run your fingers over it.

Rob

Author:  Ryan Mazzocco [ Sun Jun 02, 2013 10:54 pm ]
Post subject:  Re: Silkscreening your headstock logo.

Sorry for digging this discussion up again, but I just found it in a search. I'm trying to do this right now and here's the problem I'm having. I don't know what ink to use. the tutorials I found online said you can use an autobody paint, either enamel or lacquer based... I thought that since it was enamel based I could just use a little bottle of enamel paint like you use for painting on model cars. This was way too thin and runny and just made a huge mess under the screen. So I went to autozone and got a little bottle of touch up paint. it worked a lot better but almost instantly dried in my screen and I cannot get it cleaned out with mineral spirits and warm water and scrubbing. I'm afraid a harsher chemical like lacquer thinner may strip the emulsion. I may have ruined my screen.
So, since most every screen printing ink I've seen is labeled as being specifically for fabric, what can I use? I also am looking for a gold metallic look.

Author:  Tai Fu [ Sun Jun 02, 2013 11:11 pm ]
Post subject:  Re: Silkscreening your headstock logo.

Ryan Mazzocco wrote:
Sorry for digging this discussion up again, but I just found it in a search. I'm trying to do this right now and here's the problem I'm having. I don't know what ink to use. the tutorials I found online said you can use an autobody paint, either enamel or lacquer based... I thought that since it was enamel based I could just use a little bottle of enamel paint like you use for painting on model cars. This was way too thin and runny and just made a huge mess under the screen. So I went to autozone and got a little bottle of touch up paint. it worked a lot better but almost instantly dried in my screen and I cannot get it cleaned out with mineral spirits and warm water and scrubbing. I'm afraid a harsher chemical like lacquer thinner may strip the emulsion. I may have ruined my screen.
So, since most every screen printing ink I've seen is labeled as being specifically for fabric, what can I use? I also am looking for a gold metallic look.


You need to use inks specifically formulated for silkscreening. They should be acrylic based... artist acrylic paints might work.

Author:  martintaylor [ Mon Jun 03, 2013 2:19 am ]
Post subject:  Re: Silkscreening your headstock logo.

If you use Acrylic Paints you can get a silk screening medium to mix them with. Pretty cheap and work really well.

Author:  Ryan Mazzocco [ Mon Jun 03, 2013 9:19 am ]
Post subject:  Re: Silkscreening your headstock logo.

Or I could just read the item descriptions. oops.
I found a gold metallic ink made by speedball for screen printing. It should work. thanks.

Author:  Tom West [ Mon Jun 03, 2013 9:27 am ]
Post subject:  Re: Silkscreening your headstock logo.

Rob: Congrats on taking the creative path, but I would encourage you to take another look at inlaying. With the right tools, very few, the right technique and a bit of practice you can become quite proficient. Lots of info here and elsewhere on the net.
Tom

Author:  Bryan Bear [ Mon Jun 03, 2013 11:15 am ]
Post subject:  Re: Silkscreening your headstock logo.

Ryan, keep at it and perhaps we will see you volunteer for a silk screen demo. . .

Author:  Ryan Mazzocco [ Mon Jun 03, 2013 5:32 pm ]
Post subject:  Re: Silkscreening your headstock logo.

Bryan. I wouldn't mind. If I get good enough by next year to do a demo I'll be very happy. Although, with someone like Jeremy Kieth in the room I'm not sure how comfortable I would be demonstrating how to do something like screen printing. :D
I just made a new screen and put the first coat of emulsion on (the direction recommend 2 coats if you plan to use the screen a lot) so I hope to expose it late tonight. I should have my new ink by the end of the week. I'll let you know how it goes.

Author:  MikeyV [ Mon Jun 03, 2013 6:24 pm ]
Post subject:  Re: Silkscreening your headstock logo.

Just to add to the information here, I've used (still do) Gold Mettallic printed water slide decals for my headstock logo. It cost about $60 a sheet, shipped, I fit over 100 logos on a sheet.

They're easy to apply, you can scrape it right off if it goes on crooked.

I pore fill the headstock, then shoot a few (4-5) coats of shellac wash coat, sanding in between to get a nice flat lever surface.
Then (important) I shoot another wash coat, but leave it unsanded, so the finish showing behind the clear parts of the decal are shiny, not scuffed.

Apply the decal.

Shoot a few more wash coats over the top, then finish as normal. The ridge from the thickness of the decal disappears after the first few coats of finish.

WARNING: I did this with shellac and Varnish top coating, Nitro may instantly dissolve the decal, not sure.
AND: None of mine are really old, so I can't speak to the colorfastness. I assume people won't leave then baking in the sun.

It does leave a nice, metallic gold logo, with fine detail, I have some REALLY fine lifework in the lettering.

All that said, I'd totally silk screen it if I had the energy to get the rig up. Definitely cooler than a logo, even though it might not look toooo different.

Fun!

Author:  dzsmith [ Mon Jun 03, 2013 6:31 pm ]
Post subject:  Re: Silkscreening your headstock logo.

A silkscreen seems like a lot of effort unless you are doing a production run with the same headstock shape. (Perhaps you are).
How about having a rubber stamp made?
Or a plastic stencil and an airbrush?
Or a branding iron?

Author:  Ryan Mazzocco [ Mon Jun 03, 2013 8:24 pm ]
Post subject:  Re: Silkscreening your headstock logo.

dzsmith wrote:
A silkscreen seems like a lot of effort unless you are doing a production run with the same headstock shape. (Perhaps you are).
How about having a rubber stamp made?
Or a plastic stencil and an airbrush?
Or a branding iron?

isn't the whole process of building a guitar a whole lot of effort? of course, but we do it anyway.
but it's really not that much effort to make a screen. I had a bit of difficulty with choosing the right medium, but other than that the process has gone quite smoothly; and this is my first time ever even trying.
I think once the screen is made, which you can re-use over and over and over again, it's definitely a lot less work than inlay and I think in the end will give a much more professional look than a decal (which are more than likely screen printed too.)

Author:  cphanna [ Tue Jun 04, 2013 9:30 am ]
Post subject:  Re: Silkscreening your headstock logo.

Rob, I did some silk screen printing years ago in commercial art school. I've got an old student grade Gibson (well... my niece has it) with a screen printed logo. The only thing I don't understand about your thread is eliminating the outline. Are you referring to a different reflectivity between wood and decal under the finish?
I know that you could build up enough sealer and finish to level sand and polish with either method.
Patrick

Author:  Bryan Bear [ Tue Jun 04, 2013 10:02 am ]
Post subject:  Re: Silkscreening your headstock logo.

That's right. Jeremy could probably learn us a thing or two about silk screening couldn't he.

Author:  R.Mack [ Sun Jun 09, 2013 12:47 am ]
Post subject:  Re: Silkscreening your headstock logo.

Ryan Mazzocco wrote:
Sorry for digging this discussion up again, but I just found it in a search. I'm trying to do this right now and here's the problem I'm having. I don't know what ink to use. the tutorials I found online said you can use an autobody paint, either enamel or lacquer based... I thought that since it was enamel based I could just use a little bottle of enamel paint like you use for painting on model cars. This was way too thin and runny and just made a huge mess under the screen. So I went to autozone and got a little bottle of touch up paint. it worked a lot better but almost instantly dried in my screen and I cannot get it cleaned out with mineral spirits and warm water and scrubbing. I'm afraid a harsher chemical like lacquer thinner may strip the emulsion. I may have ruined my screen.
So, since most every screen printing ink I've seen is labeled as being specifically for fabric, what can I use? I also am looking for a gold metallic look.


Nice job Rob, it looks great

I never screen printed on wood before but I did some research a couple of months ago on printing on wood. I plan on printing on a pair of wooden eyeglasses that I'm working on. I used to screen print professionally, but I don't consider myself an expert.

There are a few company's that make screen printing inks that are specially formulated for printing on wood, plastics, metals and glass. Nazdar 59000 series inks should work just fine on wood. The good thing about company's that make screen printing inks is that for every ink system they sell, there is technical data that explains how to use the inks. The technical data also indicates what kind of stencil to use, what solvents to use for clean up, mesh count recommendations, squeege durometer etc... For a head stock logo, I personally would use a solvent resistant capillary film stencil instead of applying a liquid emulsion, even though a solvent resistant liquid emulsion will work just fine. Capillary film is made to a certain micron thickness by a machine and is a applied to a clear backing film, so the stencil is more uniform through out. Also, It's easier to apply to the screen, and isn't messy like liquid emulsion. You will also produce higher resolution prints using capillary film which is the main reason I use it. When I screen print on fabric I only use capillary film. It is more expensive than liquid emulsion, but some distributors (Victory Factory Jamaica Queens, NY) sell small amounts for under $20 (I think it's about $12.00 for a few sheets).

The Nazdar 59000 series has an air dry catalyst that is either pre-added or that the user can mix into the ink. No heat is required. The 59000 ink system also has a flattening agent to reduce gloss. I would first do all the pore filling sanding etc... then screen print the logo. I would test on scrap first. If you're printing on dark wood and want good coverage you may want to print an under base of clear or white then print your desired color on top so that the print will be more opaque, and so that no grain shows through. You would also need to choke the under base art work about 2 points so that it's not seen. You can also print the clear ink over your print to seal it. Another good thing about company's that manufacture screen printing inks is they have a tech department so that you can call and ask question before you order. One last thing that is trivial: silk is rarely used in screen printing these days. Silk is more expensive than synthetic fabrics, and not as stable, and is more difficult to reclaim . You can reclaim the screen (erase the image) by using chlorine bleach or a special screen reclaimer. These days monofilament polyester is the preferred fabric for screen printing, and can be stretched to a very high tension for superior print results.

http://www.nazdar.com/prodDetail.asp?ca ... oductID=62

Page 1 of 2 All times are UTC - 5 hours
Powered by phpBB® Forum Software © phpBB Group
http://www.phpbb.com/